

Creating a photography invoice is different from invoicing in most other industries. There are several billing methods available, and choosing the right one is crucial. Without understanding your options, you risk missing out on potential earnings or reducing your overall profit.
In this article, we will discuss three effective billing methods that are commonly used in the photography industry. They are Time Plus Cost, Upset Limit, and Lump Sum. We will discuss the advantages and disadvantages of each one.
We will also discuss how to create a photography invoice. That way, you’ll be fully equipped with all the information you need to start billing your photography clients the right way.
It might now seem important at first, but your manner of invoicing photography clients can have a huge impact on the success of any job you take. In addition, it can also affect your profit margin.
Knowing your Hourly Rate
As someone who offers photography services, you should always be mindful of your hourly rate. Time is money – if you don’t know how much your time is worth, you’ll end up wasting both time and money. So, before we get started, let’s first discuss this matter.
It’s a good practice for photographers to bill clients at minimum three to four times what they expect to get as their pay per hour. For example, if you’re expecting to earn $60,000 per year ($30 per hour) as take-home pay, you should bill your clients – at a minimum – $90 to $120 per hour for your time.
While a number of photographers claim that charging clients per hour may not be the best business practice, it’s still necessary to know what your time is worth before invoicing your clients.
Now that we have that out of the way, let’s proceed to the methods of billing photography clients:
Method #1: Time Plus Cost
This billing method is exactly what it sounds like. Basically, you bill your client for the time it took to accomplish the job, plus the direct costs that you incur to complete the work.
Note that your direct cost does not include your cost to do business (overhead). Instead, this is included in your total hourly rate.
Examples of direct costs include travel (accommodation, parking, mileage), rentals of specialized equipment (bodies, grip, lenses – essentially any equipment that you don’t own), and the cost of hiring subcontractors (makeup artists, models, stylists, caterers, etc.).
Pros of Time Plus Cost
- Useful for open-ended projects (jobs where it isn’t easy to estimate a specific amount of time to complete the work).
- You don’t have to worry about under-quoting a job.
- Get paid for exactly how much time you spend on the project and the costs you incur.
- Can be very profitable when extra work is required.
Cons of Time Plus Cost
- Clients may use Time Plus Cost as leverage to negotiate discounts.
- Can be a source of contention after completion of work.
- Clients will scrutinize everything you do during the entire project just to lower the total price.
Method #2: Lump-Sum
This method involves offering a single, predetermined price for a defined task, or a set of tasks. Lump-sum price also includes a photographer’s direct costs; however, it can also be billed separately.
If you choose this method, you must bill an entire job for a single lump-sum price. You can itemize all of your work and bill individual sum payments to each specific task.
Pros of Lump Sum
- The best-suited option for photography jobs.
- Has a very well-defined scope that’s well understood by both parties (photographer and client).
- Gives you an incentive to improve your efficiently.
Cons of Lump Sum
- A problem for photography jobs that don’t have well-defined requirements.
- The risk of spending a huge amount of time to accomplish the work due to unexpected circumstances.
Method #3: Upset Limit
This type of billing takes up the concept for both time plus the cost and lump-sum billing. Basically, it follows the time plus cost basis, but only up to a predetermined lump sum upset limit. There’s also an upset limit to the cost of expenses that can be billed to the client.
For example, you’re charging $100 per hour of photography on location up to a maximum (the upset limit) of $500, or five hours. If it takes you more than five hours to complete the work, the maximum they can charge will still be $500.
Pros of Upset Limit
- It’s usually the required billing option for some public sector clients.
Cons of Upset Limit
- Has all the disadvantages mentioned on time plus cost and lump sum.
- If you’re efficient at getting the job done, you will get less money.
- If you deal with circumstances that will increase the amount of work originally anticipated, you will still make less money.
Preferred Billing Method
So now that you have an overview of the three billing methods for photography, you now have an idea as to which is the best option for you.
Just to give you an advice, we highly recommend billing with an itemized list of lump sum items, a detailed estimate of costs and markup, as well as a detailed usage rate.
Both time plus cost and lump sum are great options, depending on the situation or the project that you’re going to tackle. Avoid upset limit as much as you can. It has way too many disadvantages for it to be worth the option. The only time you will go for upset limit is when it’s the only option billing method the client would take. Otherwise, just avoid clients that demand upset billing.
How To Create a Photography Invoice
Now that you know how to bill your clients, the next thing you need to know is how to create the right invoice for your photography work. This section will serve as a quick guide on how you can do just that. We’ll also mention useful tips that you can use to make the entire process easier and worthwhile.
1. Find the Best Invoicing Software for your Photography Business
Using basic tools like Microsoft Office will limit your capabilities of creating a professional and compelling invoice. You can also download photography invoice templates from FreshBooks.
But nowadays, you need invoicing software. This type of application not only helps you create invoices but also track and manage all of them as well. With a comprehensive invoicing system like ReliaBills, you can create, customize, send, track, and even receive payments. If you have an invoicing system in place, you’ll be able to automate the entire invoicing process. There are also other features that you can take advantage of, such as expense tracking, financial reports, and setting up recurring invoices.
2. Include Payment Terms in your Invoice
Avoid sending out an invoice that doesn’t include terms of service and payment. If you do, you’re setting yourself up for delayed payments and disputes. There are certain terms that you want to include, which you should cover within your invoice. Make sure to write this concisely and clearly. That way, it will be easier to comprehend.
Make sure you place it where it’s visible and in a legible format.
Here are some terms that you would want to include in your invoice:
- Either upfront payment or payment upon project completion.
- Due Date.
- Late fees that you will apply.
- Modes of payment that you accept.
- Whether you’ll do the project before or after receiving payment.
The purpose of these terms is to make sure everyone is on the same page. It’s good to go over each of these terms before you agree to take on a photography project.
Once you’ve determined all the relevant terms, make sure you include them in your invoice. That way, your client will also be reminded of them. You can also test out different terms and adjust them based on your needs.
3. Customizing your Photography Invoices
When you’re using a quality invoicing system like ReliaBills, you can ensure that all of your invoices come out attractive and professional. It’s essential that your invoices not only provide the details but also represent your brand as a whole.
That’s why it’s always a great idea to include your company logo, as well as colors. The best thing about using ReliaBills is that you don’t have to be a designer to be able to pull this off. ReliaBills offers a variety of templates that you can choose from.
You can then save the one you like to create invoices whenever you need to quickly. In addition, you can send them via email so that they will be received by your client right away.
Your invoice should include important information about the customer, the project that you’ve worked for them, and your business. For example, your invoice should include your business name, address, and phone number.
These details are typically positioned in the top corner of the invoice. At the same time, you should include the name of your customer, their address, and phone number.
Every invoice that you send should also contain an itemized list of all the services that you made throughout the entire project. That way, the client will know exactly what you’re charging them for. It also offers transparency and allows your clients to raise any questions before paying you.
Once the client receives your invoice email via ReliaBills, they can click and pay within minutes. This will boost your revenue since it removes any potential delays associated with confusing payment processes. In relation to that, you should always make your entire payment process as simple and straightforward as you can.
4. Monitoring your Photography Invoices
The photography business is a bustling one, which is great since you don’t run out of opportunities to earn. However, there will be problems if you’re not careful with managing your invoices.
Not paying attention to which invoices are paid and which aren’t can potentially ruin your business. Using paper-based documentation for invoicing can be complicated and burdensome. Fortunately, you can easily track and monitor your invoices with ReliaBills.
With the ReliaBills invoicing system, you can create and keep track of all your sent and pending invoices. That way, you can reach out to customers for delayed or late payments.
You can set up to where customers are sent payment reminders periodically. Once payment still hasn’t been made, you can then contact them personally.
Your invoice records will also be useful when it’s time to do your taxes. Knowing all of your income and expenses will ensure that you fill out your tax return accurately.
How to Take Your Photography Invoicing to the Next Level
Creating an invoice for your photography is great. But you can make it even better with recurring billing. This billing process will automate everything so that you can focus more on what matters the most: your photography business.
Fortunately for you, ReliaBills is more than just an invoicing system. It also serves as recurring billing software too! By creating a free account, you can automate your entire billing system and create a seamless and hassle-free payment process for you and your customers.
Why Recurring Billing?
Since people started relying on the internet for goods and services, recurring billing has skyrocketed in popularity and relevance. People are starting to take advantage of the internet and the level of efficiency and convenience it brings. With just a click of a button and in seconds, you can send your invoice to your customers. Similarly, you also get paid at the same speed and rate.
Whether you’re a freelance photographer or someone who runs a photography business, you can take advantage of recurring billing. It provides unmatched levels of convenience for you and your clients that you should consider. Here are some of them:
Time Savings
Time is an incredibly crucial resource in any business — which also happens to be the most apparent benefit that recurring billing offers. Creating your invoices manually will take you a lot of time that you could’ve spent on other aspects of your business. However, with recurring billing software like ReliaBills, creating an invoice from scratch will only take minutes.
Fewer Errors
A billing process may look simple to do, especially if you’ve been doing it for quite some time. But if you’re doing it manually, errors and mistakes will tend to occur more often than not. There are even times when you’ll need to do some edits on your invoice whenever the price changes. All of these tasks can be quite time-consuming. Fortunately, you can automate everything with recurring billing from ReliaBills.
Suppose you have regular clients who pay you every month for your photography services. In that case, you create a recurring billing process that will feature invoices sent to them automatically without you having to do it yourself. All you need to do is create your invoice, set it to recurring, and you’re all set. The system will do the hard work for you.
Need to make changes to your invoice? No problem! You can make changes whenever and wherever you want. Just remember to save your work, or else the changes won’t be made.
Improvement in Cash Flow
By using recurring billing, you can generate a better and steadier stream of monthly income. With an improvement in your cash flow, you can also ensure a predictable and more consistent monthly income. In addition, if you’re working with numerous customers, having recurring billing software will help improve your cash flow since it’s more convenient for them to pay you.
Better Customer Relationship
Speaking of customers, they will love the level of convenience and attention to detail that you’ve put into your billing system. As mentioned earlier, recurring billing makes life easier for you and your customers. In addition, while you are enjoying a hands-free billing system, your customers will find it easier to pay you since they will only have to enter their billing system once.
A recurring billing system like ReliaBills will save customer information in a safe and secure cloud. That way, your customers won’t have to manually enter their payment details every time they need to pay you online. In turn, your relationship with your customers will only improve over time.
These are only a few examples that prove recurring billing to be a reliable feature for your business. If you’re interested, head over to ReliaBills now to learn more about what we can offer. If you’re all set, all you have to do is create your FREE ReliaBills account, and you’re all set.
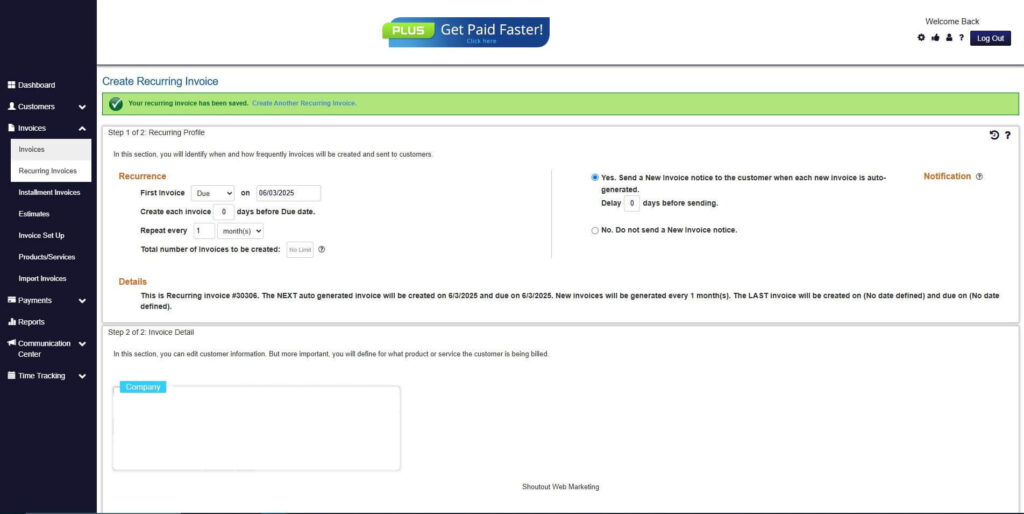
How to Create a New Recurring Invoice Using ReliaBills
Creating a New Recurring Invoice using ReliaBills involves the following steps:
Step 1: Login to ReliaBills
- Access your ReliaBills Account using your login credentials. If you don’t have an account, sign up here.
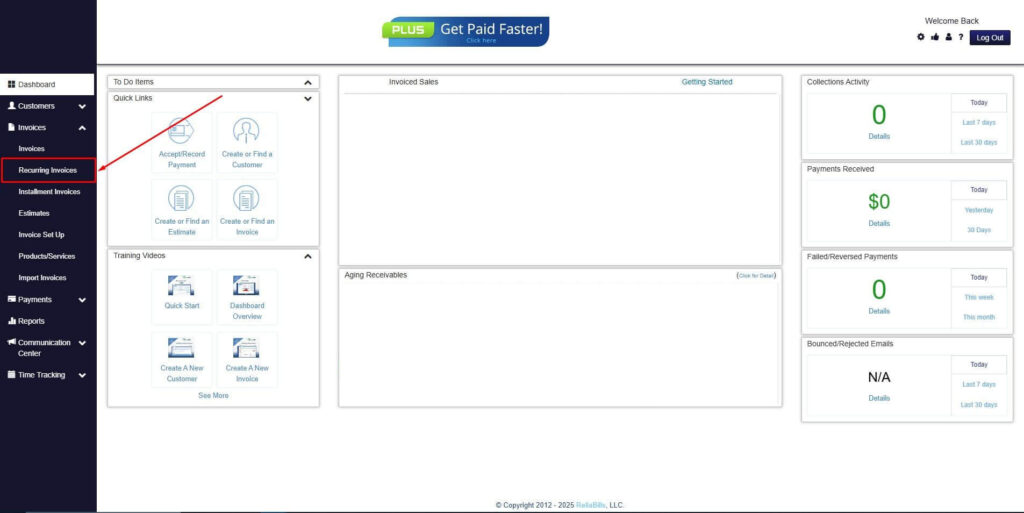
Step 2: Click on Recurring Invoices
- Navigate to the Invoices Dropdown and click on Recurring Invoices for an overview of the list of your existing customers.
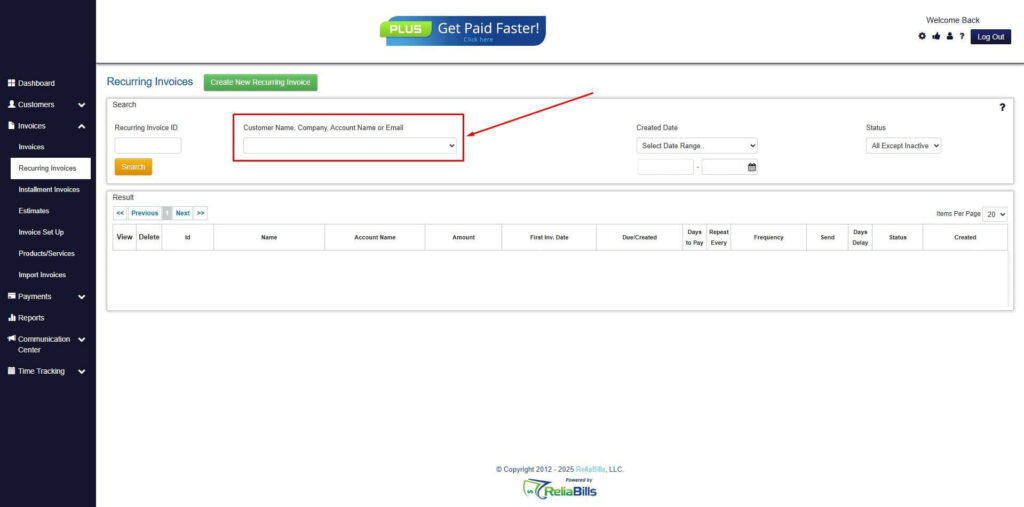
Step 3: Go to the Customers Tab
- If you have already created a customer, search for them in the Customers tab and make sure their status is “Active”.
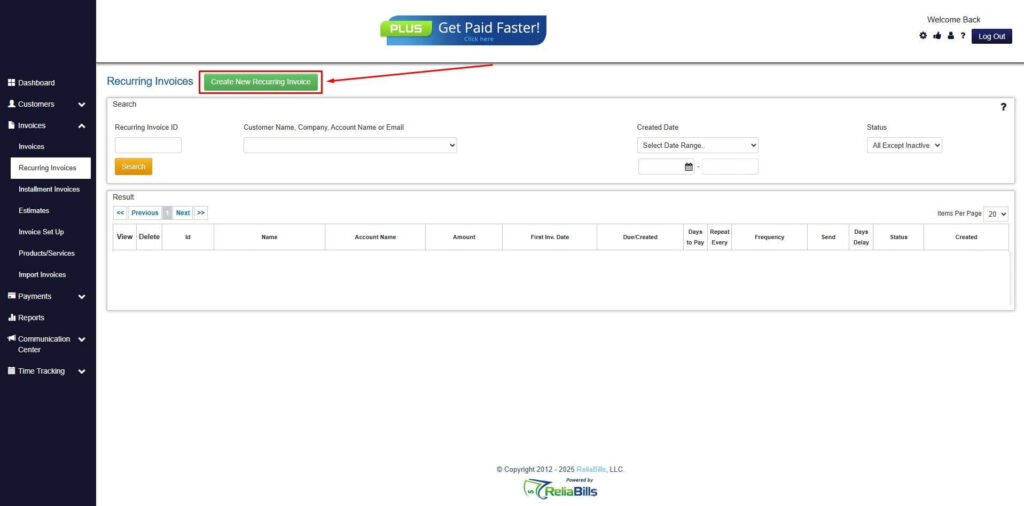
Step 4: Click the Create New Recurring Invoice
- If you haven’t created any customers yet, click the Create New Recurring Invoice to create a new customer.
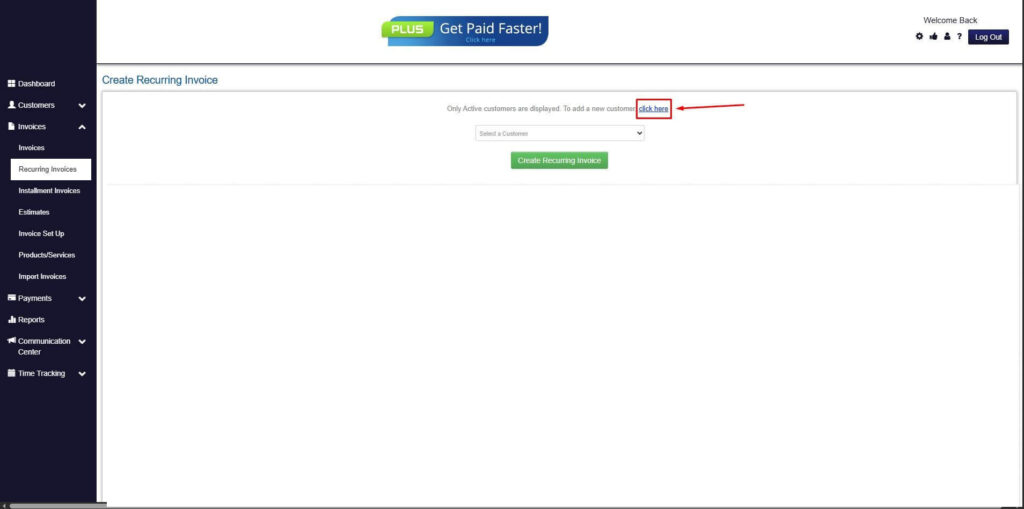
Step 5: Click on the “Click here” Button
- Click on the “Click here” button to proceed with the recurring invoice creation.
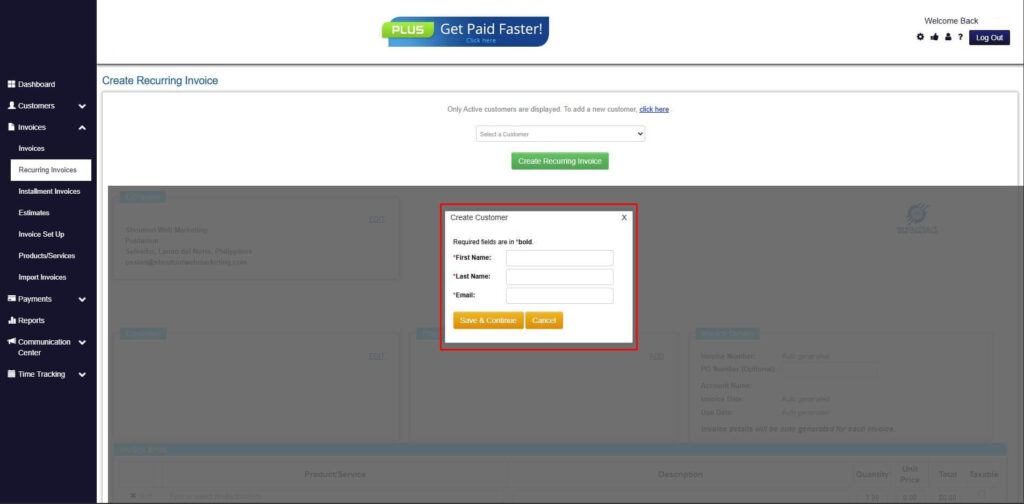
Step 6: Create Customer
- Provide your First Name, Last Name, and Email to proceed.
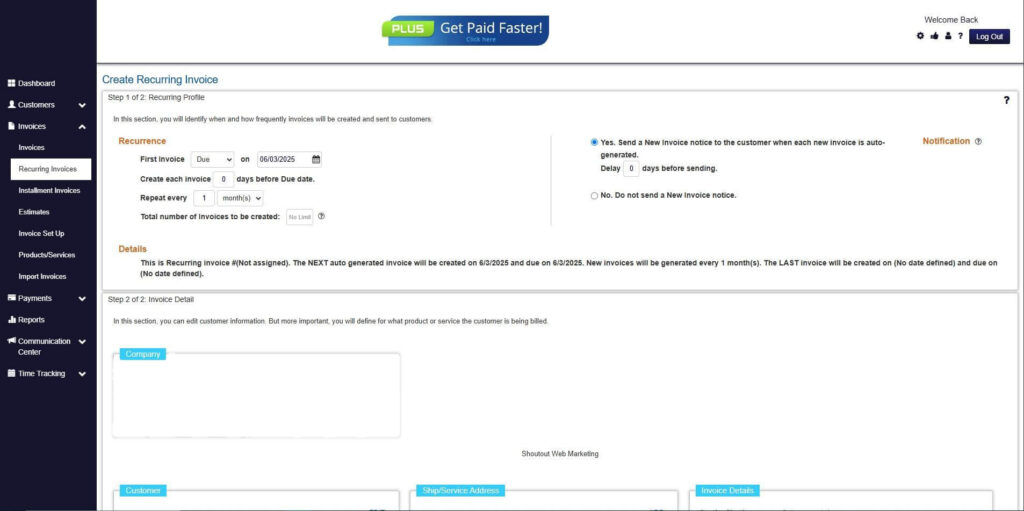
Step 7: Fill in the Create Recurring Invoice Form
- Fill in all the necessary fields.
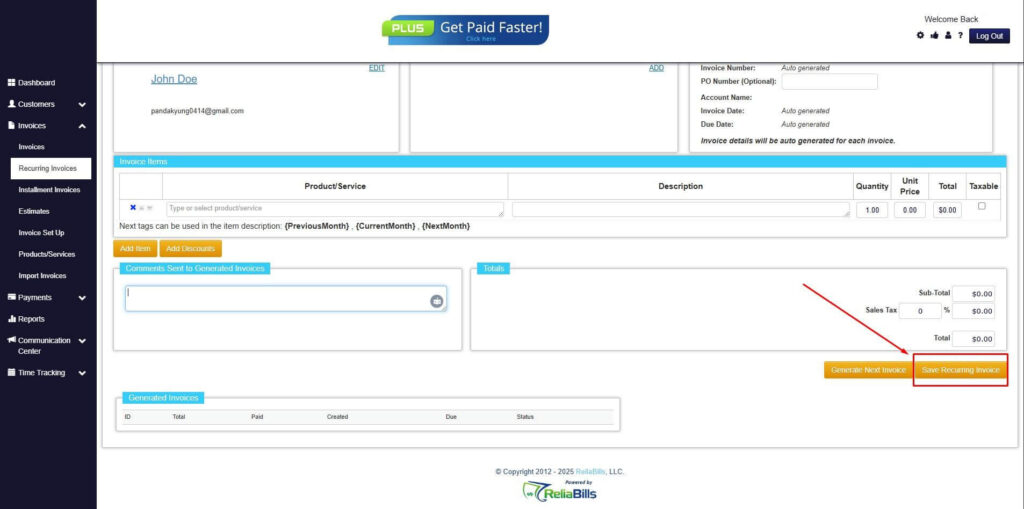
Step 8: Save Recurring Invoice
- After filling up the form, click “Save Recurring Invoice” to continue.
Step 9: Recurring Invoice Created
- Your Recurring Invoice has been created.
Wrapping Up
Now that you have all the information you need, it’s time to remodel your billing strategy and incorporate the things that you’ve learned in this article. Always keep in mind that invoicing clients isn’t as daunting as it seems, as long as you know what you’re doing.