
Most small businesses lose hours every billing cycle to the same manual tasks: generating invoices, following up on late payments, and recording what came in. Recurring billing solves that at the root. This guide walks you through exactly how to set it up in five concrete steps, from choosing a pricing model to activating the payment recovery logic that keeps revenue flowing even when cards decline.
Main Takeaway
Setting up recurring billing comes down to five decisions made in the right order: your pricing model, your platform, your customer authorization flow, your plan configuration, and your payment recovery setup. Each layer builds on the one before it. Get all five right and you have a billing system that runs itself, collecting revenue, recovering failed payments, and generating the metrics you need to grow, without ongoing manual effort.
Setting up recurring billing is the process of configuring an automated payment system that charges customers a defined amount at regular intervals, monthly, quarterly, or annually, without requiring manual invoicing each cycle. Done correctly, it involves selecting the right pricing structure, connecting a compliant payment processor, building a transparent customer enrollment flow, and activating the monitoring systems that catch and recover failed charges before they become lost revenue.
The 5 Steps to Set Up Recurring Billing
Step 1: Choose Your Billing Model
Everything else in your setup flows from this decision. Before opening any platform or touching a payment integration, you need to decide how your recurring charge is structured, because different models require different infrastructure, different customer communication, and different reporting to manage well.
For the majority of small businesses, fixed recurring billing, the same amount charged every cycle, is the right starting point. It is the easiest model to explain to customers, the easiest to forecast, and the simplest to implement. If your service is delivered as a consistent package (a monthly retainer, a software license, a membership), a flat fee is usually the most honest and operationally clean way to price it.
Usage-based or metered billing makes sense when your costs scale with customer consumption, API calls, data storage, or electricity, but it requires measurement infrastructure and adds billing complexity that most small businesses do not need on day one. A hybrid model (fixed base plus variable overage) can be a good middle ground for service businesses that want predictable baseline revenue but need to charge for significant work that falls outside the standard scope.
| Model | Amount Per Cycle | Setup Complexity | Best Fit |
| Fixed Recurring | Same every cycle | Low | Memberships, retainers, SaaS |
| Usage-Based (Metered) | Varies with consumption | High | Utilities, APIs, cloud services |
| Tiered | Fixed within usage brackets | Medium | Email platforms, CRM tools |
| Hybrid | Base fee + variable component | Medium | Agencies, managed services |
You should also decide on billing frequency at this stage. Monthly billing is lower friction at sign-up and gives customers flexibility, but annual billing improves your cash position and reduces churn because customers who pay upfront are statistically less likely to cancel mid-cycle. Offering both at sign-up, with a modest discount on the annual option, is the most common approach for businesses with healthy margins and consistent delivery.
Step 2: Select a Recurring Billing Platform
Your platform is the operational backbone of everything that follows. It needs to handle payment credential storage, automated charge scheduling, receipt generation, failed payment retries, and critically, the reporting that tells you whether your billing engine is healthy or slowly leaking revenue.
There are three broad categories to evaluate. Purpose-built invoicing software with native recurring billing, like ReliaBills, combines billing management, customer enrollment, and basic reporting in a single product designed for small business operators who do not have dedicated technical or finance staff. These platforms handle most of the complexity and compliance requirements out of the box.
Payment processor APIs (Stripe being the most commonly referenced) give you maximum flexibility but require developer work to build the billing logic, customer portal, and reporting layer on top. They are a strong choice if you have a custom application or very specific workflow requirements. General accounting software often includes basic recurring invoicing but typically lacks the dunning management and subscription analytics that become essential as your customer base grows.
| Platform Type | Developer Required | Dunning Built-In | MRR Reporting | Best For |
| Dedicated billing software | No | Yes | Yes | SMBs without tech staff |
| Payment processor API | Yes | Partial | Basic | Custom apps, developer teams |
| General accounting software | No | Rarely | No | Simple invoicing only |
| E-commerce platform | No | Via plugins | Varies | Product subscription boxes |
Whichever platform you choose, confirm before committing that it supports your chosen billing model (particularly important if you plan to offer both monthly and annual plans), that it tokenizes payment data through a PCI-compliant processor, and that it can produce clear reconciliation data for your bookkeeping workflow. Changing billing platforms after you have an active subscriber base is operationally painful; migrating stored payment tokens requires careful coordination with both processors and creates a real risk of billing disruptions.
Step 3: Build Your Customer Authorization Flow
This is the step most guides underemphasize, which is why chargebacks and billing disputes are so common even among businesses that have their technical setup correct. Customer authorization is both a legal requirement and the foundation of a healthy billing relationship. Get it wrong and you will be recovering from disputes rather than focusing on growth.
The authorization flow is whatever experience a customer goes through to provide their payment details and agree to be charged on a recurring basis. At minimum, it must clearly disclose the billing amount, how often they will be charged, when the first charge will occur, and how they can cancel. This disclosure cannot be buried in terms and conditions; it needs to be visible and acknowledged at the moment the customer enters their payment information.
Legal note: In the United States, the FTC’s Negative Option Rule requires clear disclosure of recurring billing terms before the customer provides payment details, not after, and not only in fine print. Similar requirements exist in the EU under consumer protection regulations. Always have your authorization language reviewed by a legal professional for your specific jurisdiction before going live.
Beyond compliance, best practice is to send a pre-billing notification email 3 to 5 days before each charge for annual subscribers and before the first charge and any amount changes for monthly ones. This single habit eliminates the majority of “I didn’t know I was being charged” disputes. It also builds trust, customers who receive clear, timely billing communication cancel less frequently than those who only hear from you when the charge hits their statement.
Your authorization flow should also include a clear, easy-to-find cancellation path. Counterintuitively, making cancellation easy reduces the impulse to file a chargeback, which is significantly more damaging to your account than a straightforward cancellation. The goal is a customer who chooses to stay, not one who cannot figure out how to leave and escalates to their bank instead. Effective customer management starts here, at the enrollment stage, where expectations are set for the entire relationship.
Step 4: Configure Pricing Plans and Billing Schedules
With your platform selected and your authorization flow designed, you are ready to configure the actual billing structure inside the platform. This is where the product decisions from Step 1 become operational settings: your plan tiers, prices, billing frequencies, trial periods, and any promotional pricing rules.
Most platforms let you create multiple plans and assign customers to the appropriate one during enrollment. A common starting configuration for a service business might look like this: a single core plan offered at a monthly price, with an annual option at a 15 to 20 percent discount. Customers who choose the annual plan are charged the full year upfront and receive a confirmation that locks in their rate. Customers on the monthly plan see a new charge on the same date each month and receive a receipt automatically.
If you offer free trials, configure the trial period length and what happens when it ends. Does the customer get charged automatically, or do they need to actively confirm? Auto-conversion is operationally simpler, but it requires very clear disclosure in your authorization flow (see Step 3) to avoid disputes. Opt-in conversion reduces risk but also reduces conversion rates. The right answer depends on your customer acquisition cost and the average value of a converted trial customer.
Pro tip: Set all your billing dates to a consistent day, for example, the 1st of the month, rather than anchoring them to each customer’s sign-up date. This makes monthly reconciliation straightforward and makes it much easier to spot anomalies in your MRR figures. Platforms like ReliaBills support custom billing date normalization as a built-in setting, so no custom logic is required.
At this stage, also configure your statement descriptor, the text that appears on a customer’s credit card or bank statement next to the charge. It should be recognizable, not truncated into something confusing. A descriptor that customers do not recognize is one of the top triggers for chargebacks, even when the charge is legitimate. Most platforms allow you to set this at the account or plan level, and it is worth testing how it appears across a few different card issuers before going live.
Step 5: Activate Dunning, Notifications, and Revenue Tracking
This final step is what separates businesses that set up recurring billing and then manage it reactively from those that run it as a proactive revenue system. The setup work here is done once, configuring retry logic, notification sequences, and reporting dashboards, but the payoff is ongoing: recovered payments that would otherwise be lost, customers who stay because they were reached before their access lapsed, and metrics that give you early warning of churn before it compounds.
Dunning management is the automated process of retrying failed charges and communicating with customers whose payment has not gone through. A standard retry schedule attempts the charge again on day 3, day 7, and day 14 after the initial failure. Each retry is accompanied by an email that informs the customer of the issue and provides a direct link to update their payment method. This is not aggressive; it is helpful. Most customers whose card declines do not know it happened, and a clear, professional notification is the fastest path to resolution for everyone.
Beyond dunning, configure pre-billing notifications for your annual subscribers (3 to 5 days before renewal), renewal receipts (sent immediately after a successful charge), and failed payment notifications (triggered on initial decline). These three email types alone handle the vast majority of billing communication that customers need and that prevents disputes.
Finally, set up your reporting. The three numbers worth tracking weekly at minimum are Monthly Recurring Revenue (MRR), your baseline predictable revenue; churn rate, the percentage of subscribers who cancel or fail to renew in a given month; and recovery rate, the percentage of initially failed payments your dunning system successfully collects. These three metrics tell you, at a glance, whether your recurring billing operation is healthy and growing or whether something needs your attention.
How to Create a New Recurring Invoice Using ReliaBills
Creating a New Recurring Invoice using ReliaBills involves the following steps:
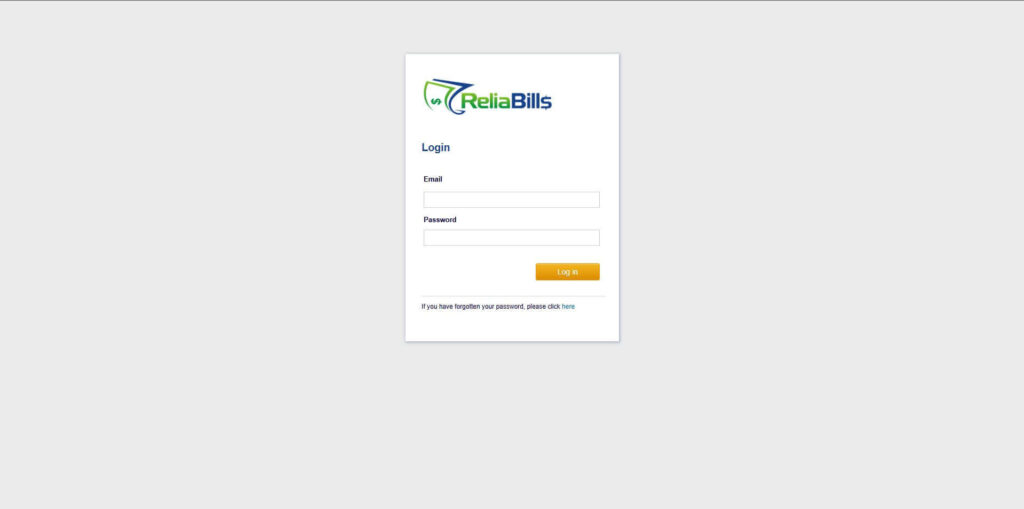
Step 1: Login to ReliaBills
- Access your ReliaBills Account using your login credentials. If you don’t have an account, sign up here.
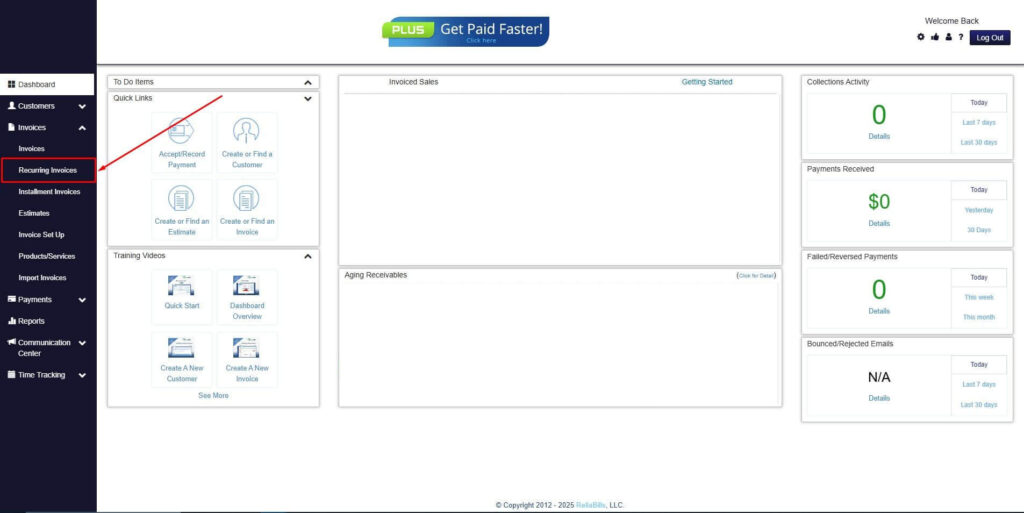
Step 2: Click on Recurring Invoices
- Navigate to the Invoices Dropdown and click on Recurring Invoices for an overview of the list of your existing customers.
Step 3: Go to the Customers Tab
- If you have already created a customer, search for them in the Customers tab and make sure their status is “Active”.
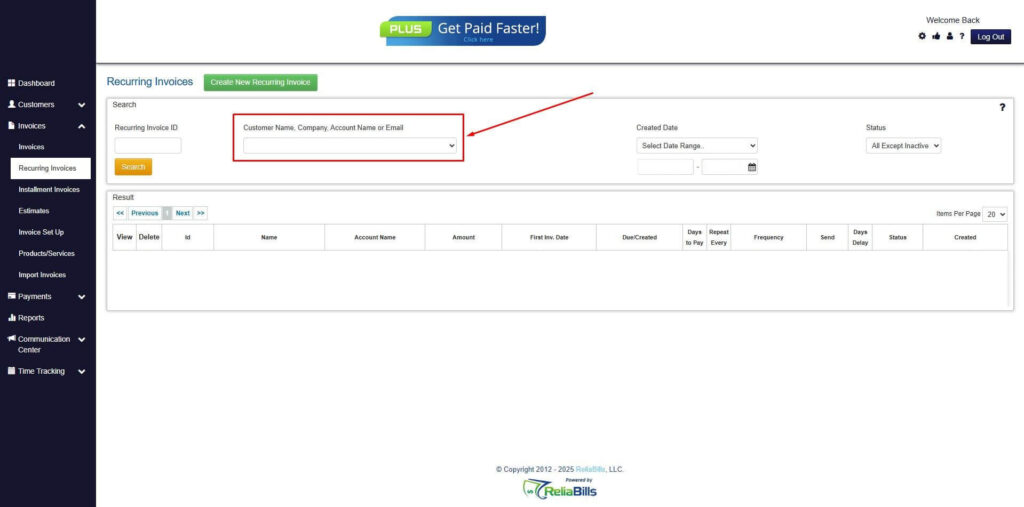
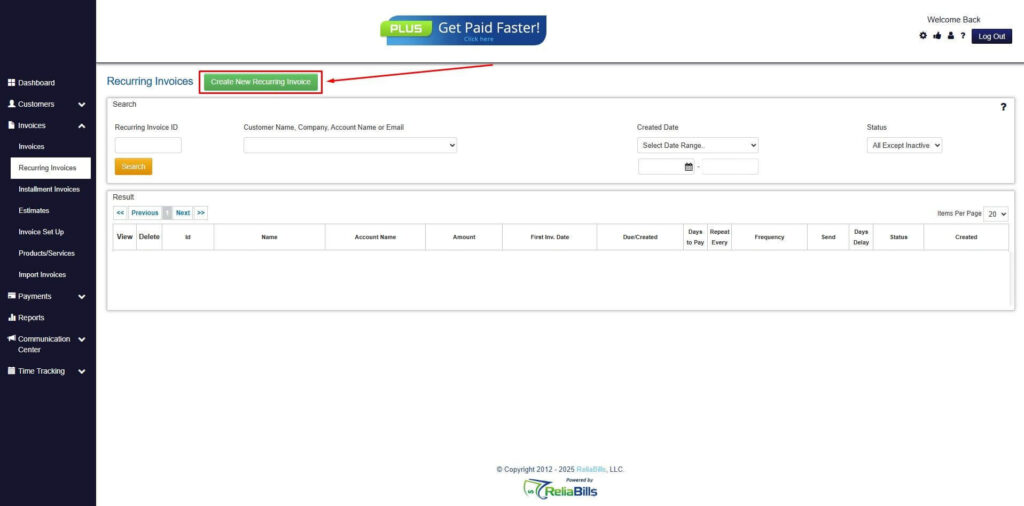
Step 4: Click the Create New Recurring Invoice
- If you haven’t created any customers yet, click the Create New Recurring Invoice to create a new customer.
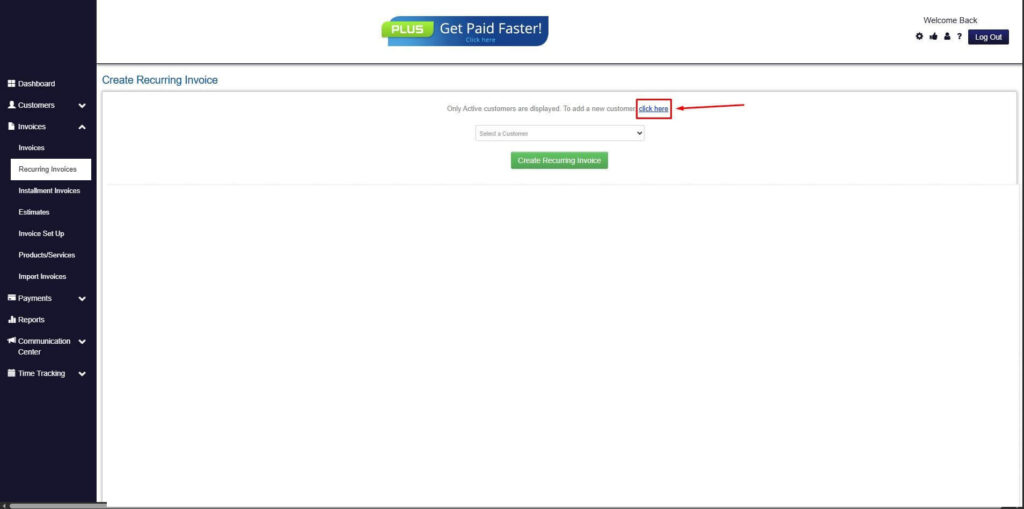
Step 5: Click on the “Click here” Button
- Click on the “Click here” button to proceed with the recurring invoice creation.
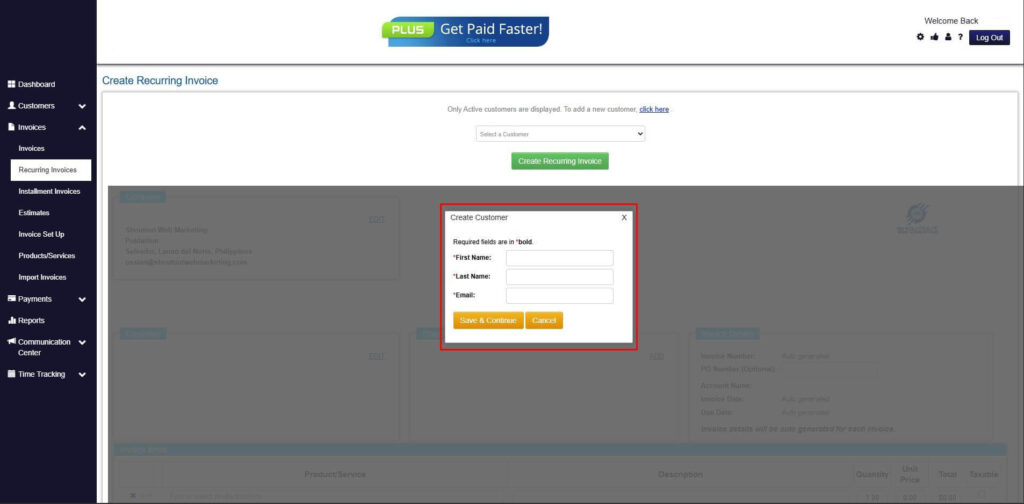
Step 6: Create Customer
- Provide your First Name, Last Name, and Email to proceed.
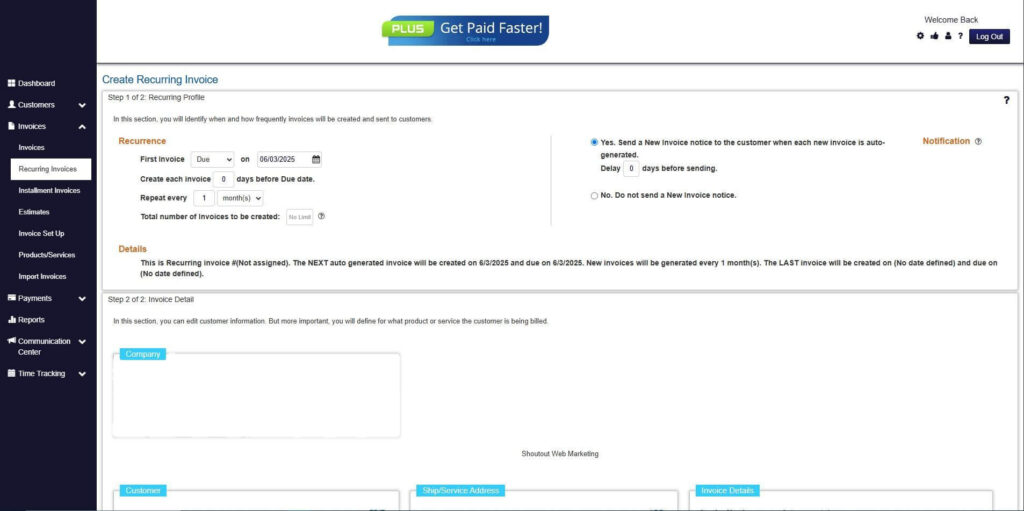
Step 7: Fill in the Create Recurring Invoice Form
- Fill in all the necessary fields.
Step 8: Save Recurring Invoice
- After filling up the form, click “Save Recurring Invoice” to continue.
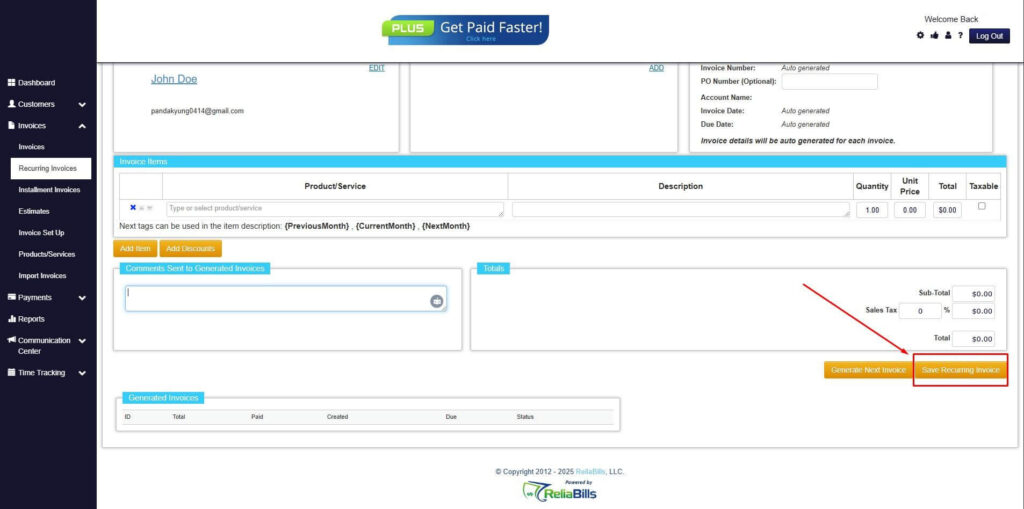
Step 9: Recurring Invoice Created
- Your Recurring Invoice has been created.
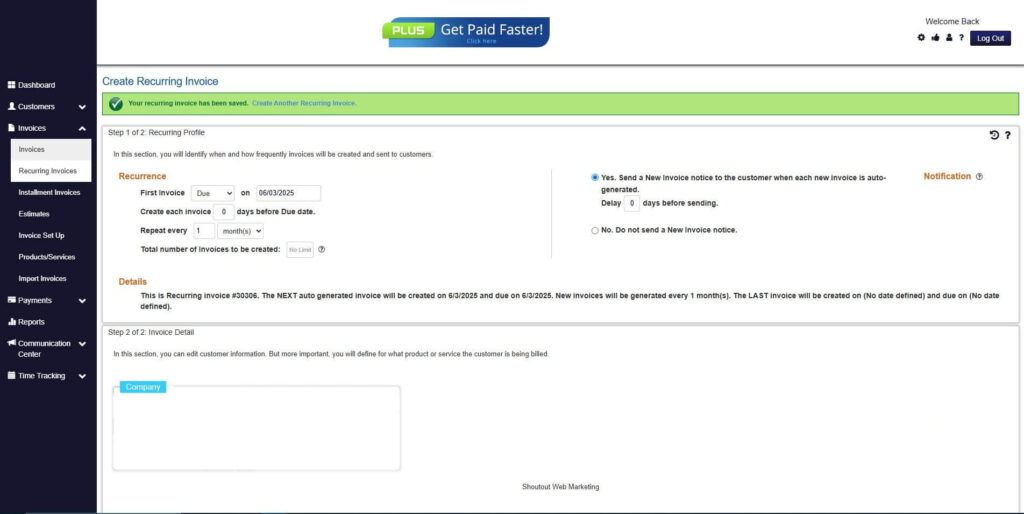
Pre-Launch Checklist
Before you send your first billing enrollment to a live customer, run through this checklist. Every item here represents a real-world failure point that businesses encounter after going live when they would have been far easier to address before.
Ready to Go Live?
- Billing model and pricing confirmed; monthly and/or annual plans created on platform
- The payment processor connected and test transactions completed successfully
- Customer authorization flow reviewed by a legal or compliance professional
- Statement descriptor set is verified and recognizable and not truncated
- Pre-billing notification emails configured and test-sent
- Dunning retry schedule configured (day 3 / day 7 / day 14 or equivalent)
- Cancellation flow accessible and clearly communicated in the enrollment experience
- MRR, churn, and recovery rate reporting enabled and verified
- Accounting integration or export configured for revenue reconciliation
How Different Businesses Use These 5 Steps
The five steps are the same regardless of industry, but the decisions within each step look meaningfully different depending on your business model. Here is how three common small business types work through the same framework.
| Business Type | Step 1: Model | Step 2: Platform | Step 3: Authorization | Step 4: Plans | Step 5: Dunning Priority |
| Freelance / Agency | Fixed monthly retainer | Dedicated billing software | Signed retainer agreement + enrollment email | 1–2 tiers, monthly + annual | High: missed retainer = service pause |
| SaaS / Software | Tiered or hybrid | API + billing library or dedicated platform | In-app checkout with clear trial terms | 3–5 tiers + freemium | Critical: access gates drive recovery |
| Fitness / Wellness | Fixed monthly membership | Dedicated billing software or vertical tool | Paper or digital membership form | Monthly and annual family plans | Medium: access restriction prompts update |
| Managed IT / MSP | Hybrid (base + usage) | PSA tool or dedicated billing software | Master service agreement (MSA) | Per-device or per-user tiers | High: contract terms define cure period |
The pattern here is consistent: businesses where the recurring charge is tied to access to something the customer actively uses (software, a gym, or IT support) have a natural dunning advantage, because restricting access when a payment fails is itself an effective prompt for customers to update their billing details. Businesses offering less tangible ongoing value, like retainers or advisory services, need to invest more in the communication side of dunning to achieve comparable recovery rates.
Key Benefits of Getting This Right
The five-step framework is designed to set up not just a billing system that works at launch but one that improves your business economics in ways that compound over time. The benefits below are what you are actually building toward, and each one traces back to a specific decision in the setup process.
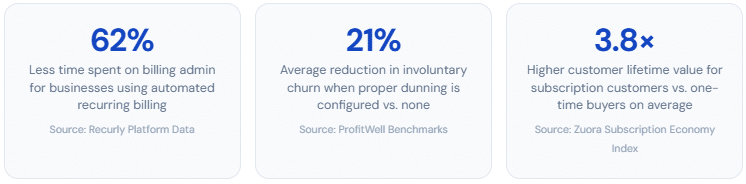
Predictable, forecastable revenue is the most visible benefit. When billing runs automatically on a schedule, you stop making financial decisions based on what you think is probably coming in and start making them based on what you know is coming in. That shift, from estimates to certainty, has a real effect on how confidently a small business can invest in hiring, marketing, or operations.
Structurally higher customer retention follows naturally from autopay. The behavioral economics are well-documented: customers who are on autopay default to staying rather than actively deciding to continue. Every manual renewal is a moment of potential churn; recurring billing removes most of those moments from the equation. Combine that with strong customer lifecycle management through customer management tools, and the retention difference becomes significant within six to twelve months.
Finally, a properly configured recurring billing setup reduces the cost of revenue collection in a way that scales. Adding 50 more subscribers to a well-configured system adds almost no administrative work. Adding 50 more clients to a manual invoicing workflow adds 50 more hours per year, at minimum.
Risks to Manage and Mistakes to Avoid
The five steps exist in a specific order partly because skipping or rushing any of them creates problems that are disproportionately expensive to fix after customers are enrolled. These are the failure points most commonly seen when recurring billing is set up in a hurry.
| ✅ What Good Setup Prevents | ⚠️ Common Setup Mistakes |
| → Chargebacks from customers who do not recognize the charge or forgot they enrolled | → Skipping legal review of the authorization flow and assuming implied consent is enough |
| → Involuntary churn from expired cards that go undetected for weeks | → Setting a statement descriptor that customers do not recognize, triggering fraud disputes |
| → Revenue recognition errors from mishandled annual prepayments | → Launching without a dunning sequence and manually following up on failed payments |
| → Platform migration headaches caused by choosing the wrong tool at launch | → Choosing a platform based on price alone without verifying it supports your billing model |
The Chargeback Risk
Chargebacks are the most acute operational risk in recurring billing. When a customer disputes a charge directly with their bank, rather than contacting you, you lose the transaction amount, pay a dispute fee (typically $15 to $35 per incident), and accumulate a dispute ratio that card networks monitor. Exceed a dispute threshold (usually around 1% of monthly transactions for Visa) and you risk penalties or loss of your merchant account.
The good news is that the majority of recurring billing chargebacks are preventable. A study of dispute reasons consistently shows that “unrecognized charge” and “didn’t know billing would recur” are the top two causes, both of which are addressed directly by a clear authorization flow (Step 3) and a recognizable statement descriptor (Step 4). Businesses that invest in these two elements see chargeback rates well below the threshold that triggers network scrutiny.
Important: If your chargeback rate exceeds 0.9% of monthly transaction volume, most payment processors will issue a warning. At 1% or above, you may be placed on a monitoring program that carries additional fees and restrictions. Monitor your dispute ratio monthly; your billing platform should surface this in the reporting dashboard.
Recurring Billing vs. Adjacent Payment Setups
Businesses evaluating whether to set up recurring billing sometimes compare it against related arrangements. Understanding where each model actually differs, not just conceptually but operationally, helps clarify which is right for a given situation.
| Setup Type | Customer Action Each Cycle | Amount Fixed | Defined End Date | Dunning Needed | Setup Complexity |
| Recurring Billing | None (autopay) | Usually | No | Yes | Low–Medium |
| Installment Billing | None (autopay) | Yes | Yes | Partial | Low |
| Manual Invoicing | Pays each invoice | Varies | Per project | Manual | Very Low |
| Direct Debit (ACH) | None (autopay) | Usually | No | Yes | Medium |
| Standing Order | None (customer-set) | Yes | No | Merchant cannot retry | Low (customer manages) |
The standing order comparison is worth dwelling on briefly. In a standing order arrangement (common in the UK), the customer instructs their bank to push a fixed amount to you on a schedule, meaning you have no ability to retry if it fails, no ability to change the amount without the customer reconfiguring it, and no system-level visibility into upcoming payments. It is low-friction for the customer, but it puts operational control entirely in their hands. Recurring billing inverts this: you initiate the charge, you control the retry logic, and you have full visibility into what is coming and what has failed.
What Happens to Churn When Dunning Is Configured
One of the most concrete arguments for going through all five setup steps, rather than stopping after you have plans live and customers enrolled, is what happens to involuntary churn without an active dunning configuration. The chart below illustrates the difference in monthly subscription retention between a business with no automated retry logic and one with a basic three-attempt dunning sequence.
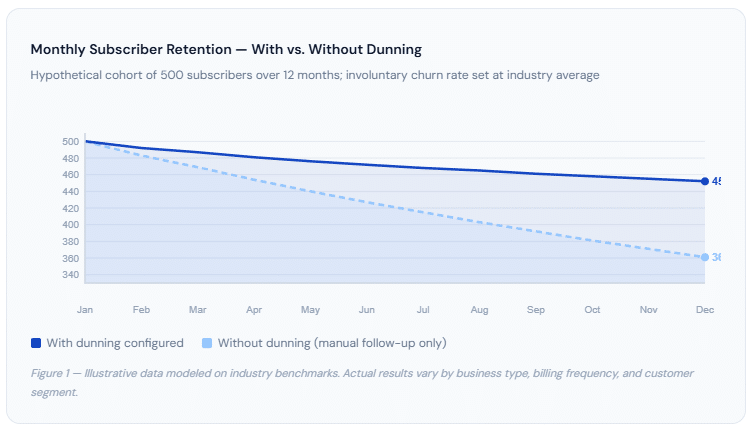
After twelve months, the business with dunning configured retains approximately 90% of its original cohort, losing most attrition to deliberate voluntary cancellations. The business without dunning retains only around 72%, with a significant share of that gap attributable to payment failures that were never recovered. At 500 subscribers paying $50 per month, that difference represents roughly $10,800 in monthly recurring revenue, not from acquiring more customers, but simply from not losing the ones already enrolled.
Frequently Asked Questions
1. How long does it take to set up recurring billing?
With a purpose-built billing platform, the core setup, creating a plan, connecting a payment processor, and enrolling your first customer can be completed in a single business day. The steps that tend to take longer are the ones that should: drafting and reviewing your customer authorization language, setting up your dunning email sequences, and testing the full enrollment-to-charge flow with test transactions before going live with real customers. Businesses that rush those stages typically spend more time fixing problems later than they saved at setup.
2. Do I need a developer to set up recurring billing?
Not if you use a purpose-built billing platform. Products designed for small business operators handle all the technical complexity, payment tokenization, PCI compliance, retry logic, and reconciliation through no-code workflows that do not require programming knowledge. Developer involvement becomes relevant if you want to embed a checkout form directly into a custom website or mobile application, or if you need deep integration with another piece of software that is not natively supported. For most small businesses, the no-code path is faster, cheaper, and more reliable.
3. What payment methods can I accept with recurring billing?
Credit and debit card billing is the most widely supported and the most familiar to customers in B2C contexts. ACH bank transfer (US) and SEPA direct debit (EU) are popular for B2B recurring billing because they carry lower processing fees, typically 0.5 to 0.8% per transaction compared to 2 to 3% for card payments, and are less susceptible to card expiration issues. Some platforms also support digital wallets for one-time charges but typically still require a card or bank account on file for recurring billing. The payment methods available to you ultimately depend on your chosen payment processor and geography.
4. Is customer consent required before setting up a recurring charge?
Yes, in virtually every jurisdiction, and the bar for what counts as “sufficient” consent is higher than most businesses assume. In the United States, the FTC requires clear, conspicuous disclosure of the recurring billing terms before the customer provides payment information, not buried in terms and conditions or visible only after clicking. In Europe, similar requirements exist under consumer protection frameworks. The practical standard is that a reasonable person reading your enrollment flow should be unable to miss that they are signing up for a recurring charge, how much it is, and how to cancel. A documented record of that consent, a timestamp, and the version of terms agreed to are also important for resolving disputes if they arise later.
5. What is the difference between setting up recurring billing and setting up a payment gateway?
A payment gateway is the infrastructure layer that authorizes individual transactions; it connects your platform to card networks and banks, validates that a card is real and has sufficient funds, and facilitates the transfer of money. Recurring billing is the scheduling and automation layer that sits on top of the gateway. The gateway processes each individual charge; the billing system decides when to initiate a charge, for how much, for which customer, and what to do when the gateway returns a decline. You need both, but choosing a billing platform that already integrates with a gateway means you set them up as a single system rather than building the connection yourself.
Related Articles:
- What Are the Risks of Manual Recurring Billing and How to Avoid Them?
- What Is Recurring Billing? A Complete Guide for Small Businesses