
It’s 2020 – gone are the days of having to create your invoices via snail mail. Not only did this method slow down payment, but it also placed businesses at risk of not getting paid. Non-payment is the last thing you want to happen after you’ve provided service or sent a product to your client.
Send Invoice via Email
Mail can get lost and misplaced all the time. That means placing your invoices in the mail will increase the chances of it being ignored or misplaced by the recipient. To put it simply, mail just isn’t an effective and reliable way to handle invoices.
Fortunately, there are effective ways on how to send an invoice via email, and you must know them. If you’re new to sending invoices via email and would like to speed up payments, then we’ve got the strategies that will help get you over the top.
Doing the methods that we’re about to show you will help in collecting payments on time. If you’re a small business, you’re probably aware that on-time payments are a major issue, particularly in countries like the US, UK, and Australia.
If you’re not aware of this, here’s a quick glance at the actual percentages of unpaid invoices for small businesses in select countries:
- United Kingdom – 18%
- France – 11%
- Singapore – 18%
- South Africa – 15%
- Ireland – 15%
- Spain – 15%
In these regions, small businesses spend an average of 14-30 days following up on these late payments. As you may have known, it’s not only a waste of time but a significant burden to bear for small businesses.
How To Send an Invoice via Email?
If you’re looking for a way to speed up the invoicing and payment process, it’s time to learn five effective ways to send invoices via email and get paid right away. That way, your invoice will be received, and you will get paid fast.
#1 Create a Professional Invoice
Sending a regular invoice is one thing; sending a professional invoice is another. As a small business, you need to always go for the latter. No matter how many strategies you use in this list, you won’t be taken seriously if you send out a badly-composed invoice. That’s why before we go further, let’s first take a look at how to create a professional invoice.
This part is sometimes neglected by people. But keep in mind that knowing how to create an invoice is just as important as knowing how to send one. Creating an invoice isn’t rocket science. So there’s no need to be intimidated by it. All you need is to have a template, know the elements that comprise an invoice, and your all set.
First, your invoice should have a consistent template so that your customers will quickly recognize that it’s from your company. This includes elements like your company logo.
In addition, there are also key details that should be included in all of your invoices.
These include the full name of the customer and their contact details. You can place this at the top-right corner in this order:
- Full name of the client.
- Address
- Phone Number
You can then add your business name – or legal name if you’re an independent freelancer, along with your contact details. Use the same format above. Also, include the invoice date (the day the invoice is sent) and the corresponding due date.
The deadline will depend on the agreement between you and your customers during negotiation. So make sure you discuss the terms of payment before you start working for a client as this document will also include how long the customer will have to pay invoices. Some freelancers and small businesses give clients a week or two, up to even a month.
Every invoice that you send should also contain a unique number. It can be a series of numbers or alphanumeric strings. Make sure you don’t mix up or duplicate invoice numbers. That way, you can track an invoice right away without getting through many issues.
Include an itemized list of goods sent or services provided, as well as the breakdown of the rates. That way, the total amount will be understood easily. At the same time, it will also prevent any potential disputes between buyers and suppliers.
Finally, it’s also a good idea to discuss the late fees that you will charge. This is for the event that the due date passes and payment have not been made. That’s all there is to it. Making an invoice isn’t that hard as long as you know what to include. Just make sure you don’t forget the essential parts like the due date, the company address, and the client address.
#2 Sending Invoice as an Attachment
Creating an invoice is not in the backseat. You now know how to create one; now it’s time to know a thing or two about sending an invoice. When you send an invoice, always make sure that it’s attached to the email. The invoice number must be in the subject line, and it should also be mentioned in the body of your email.
If you decide to create your invoice, you can use templates available online or create one from scratch. Use the tips on the first tip to create an invoice that contains all the essential components to make it unique and professional. Make invoices unique, and your subject line needs to be straightforward. Sending an invoice requires you to know the payment terms and knowing what it’s all about.
Always keep in mind that your invoice needs to have all the necessary components outlined above. Once you’re through, save your invoice in.PDF format with a file name that will make it easy to find and identify. For example, you can name your invoice document in its corresponding invoice number along with the date. The invoice attached will then be the basis that your client will use to pay you. So make sure your subject line is on point.
For fast tracking, create a folder for all of your invoices
In that way, you will have them stored in one location for easier retrieval.
Once everything is set, log into your email platform of choice (Gmail, Yahoo! Mail, Hotmail, etc.). You can even use your company email for more personality. Open “compose email” and select the contact information of your recipient. In the subject line, type something like “[Company Name] Invoice #XXXX for [Project] Due XX/XX/XX.”
Make sure you make it clear what the email is all about so that the recipient can identify it right away and not ignore it. It will also spark a sense of urgency since it has the word “invoice” in the subject line. Make sure you send it to the recipient who’s responsible for paying you, as well as a carbon copy (CC) to other relevant parties involved in the project.
Attach the invoice that you created using the platform that you chose then hit “send.” You can even add a read receipt to the email. That way, you will know when the invoice has been opened, it was read or not, or if it has gotten lost or was received but never opened.
#3 What To Include in your Invoice Email
If you plan to send your invoice through email, you must include a professional message. Don’t send your attached invoice in an email with no message.
Write a note that’s polite, concise, and short. Make sure you’re swift when it comes to sending out your invoice emails.
Always be polite in your message about requesting payment. Being courteous and understanding goes a long way in terms of getting you paid. You will also develop a good working relationship with your clients.
At the end of your message, specify the amount that is owed to you, as well as the due date. Be sure to include the forms of payment that you accept. Keep in mind that the more payment option you offer, the better.
Here’s an example to get you started:
Hi (insert client’s name),
This message serves to inform you of the recent invoice #XXX for the (project name) that we completed for you. You can find the official invoice attached below.
The total balance is $XXX.XXX and is due by XX/XX.
You can make the payment by clicking this link.
You can also mail it to:
(insert company address)
Please don’t hesitate to contact us if you have any questions or concerns.
Thank you.
(Your Company Name)
(Contact information)
Emailing Invoices Using Invoicing Platforms
Finally, when you want e-billing processes that are smooth and fluid, opt for an invoicing platform service like ReliaBills. That way, you can automate your entire invoice system without having to waste too many resources.
Why You Should Consider Sending Invoice via ReliaBills
If you want to send an invoice to your clients via email in hopes of getting paid fast, ReliaBills is the solution that will get you there. The internet is making our lives easier with services designed to specifically make a traditionally tiresome job into a quicker and more convenient one. However, when it comes to payment processing, you have recurring billing as the creme of the crop when it comes to billing strategies. This payment structure is what ReliaBills uses and offers to its valued customers.
We use recurring billing; therefore, we know just how effective it is at getting your clients to pay and increasing your earning potential at the same time. Our proven-tested recurring billing system lets you automate your entire billing process from invoicing to receiving payment. That way, you can spend more time on other parts of your business that also need attention.
Will It Improve your Chances on Getting Paid?
Yes, sending your invoice via email is great and will improve the chances of getting you paid. But what if you do that plus allow your customers to save their billing details so that they won’t have to enter them every time they want to pay you manually? Now that’s getting paid quickly and efficiently.
Using your recurring billing software, you can enroll your customers in AutoPay, a safe and secure system that allows you to save and store customer information that you can use to bill and charge your customers regularly later on.
Once you’ve obtained all the necessary payment details from your customer, they will then need to authorize you to bill them regularly depending on the predetermined payment cycle. Once everything is set, you can start charging and collecting payment from your customer’s account automatically. Doing so will allow you to get paid consistently. At the same time, your customers will enjoy the convenience of not thinking about their payments due from you ever again.
Setting up is straightforward. All you need is to sign up for a free account. Once you’re in the system, start creating your invoice. Then, set it to recurring while also entering the payment information and schedule. Once you’re set, you can start enjoying the benefits that recurring billing has to offer.
If you want additional features, you can upgrade to ReliaBills Plus for only $24.95 per month.
Upgrading to the PLUS plan will give you access to the following features:
- Auto collection notifications
- Automated failed payment recovery
- Automatic reversed payment feed
- Automated late fees
- Chargeback recovery
- Exportable Reports
- Full API
- Scheduled Reporting
- SMS text messaging
- Online customer Auto Pay auth form
- QuickBooks Online Sync
Upgrading to PLUS will make your recurring billing system much more comprehensive since it provides you with some additional quirks that will add to the full automated experience that you and your customers will have.
Plus, since it’s on a month-to-month basis, you can cancel your subscription and revert to the basic free plan whenever you want. No restrictions or surprise fees are necessary! All ReliaBills wants is to help you get paid, and we mean it a lot.
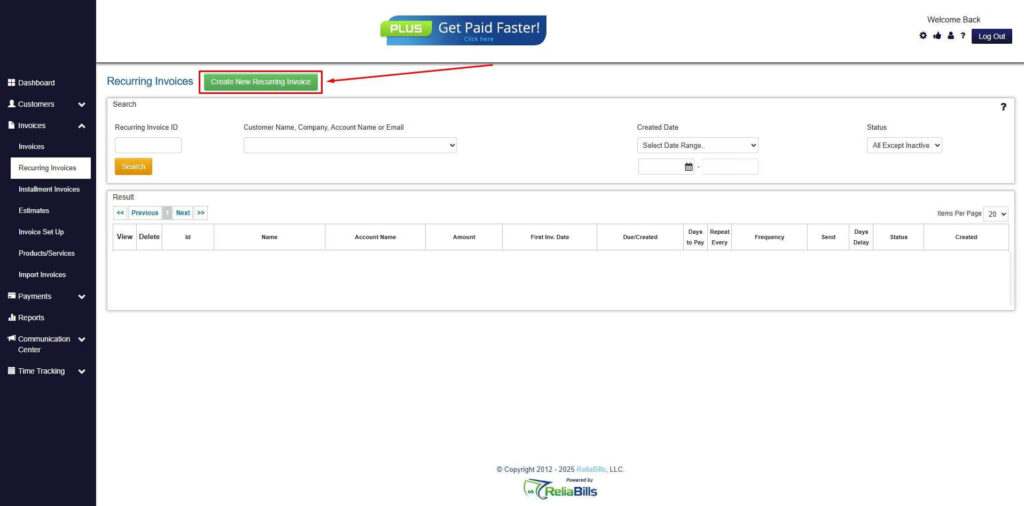
How to Create a New Recurring Invoice Using ReliaBills
Creating a New Recurring Invoice using ReliaBills involves the following steps:
Step 1: Login to ReliaBills
- Access your ReliaBills Account using your login credentials. If you don’t have an account, sign up here.
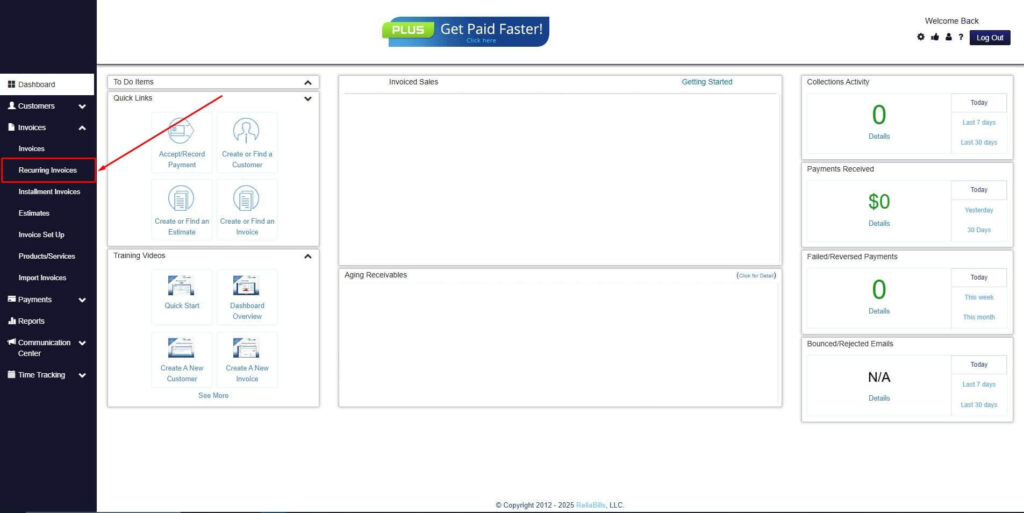
Step 2: Click on Recurring Invoices
- Navigate to the Invoices Dropdown and click on Recurring Invoices for an overview of the list of your existing customers.
Step 3: Go to the Customers Tab
- If you have already created a customer, search for them in the Customers tab and make sure their status is “Active”.
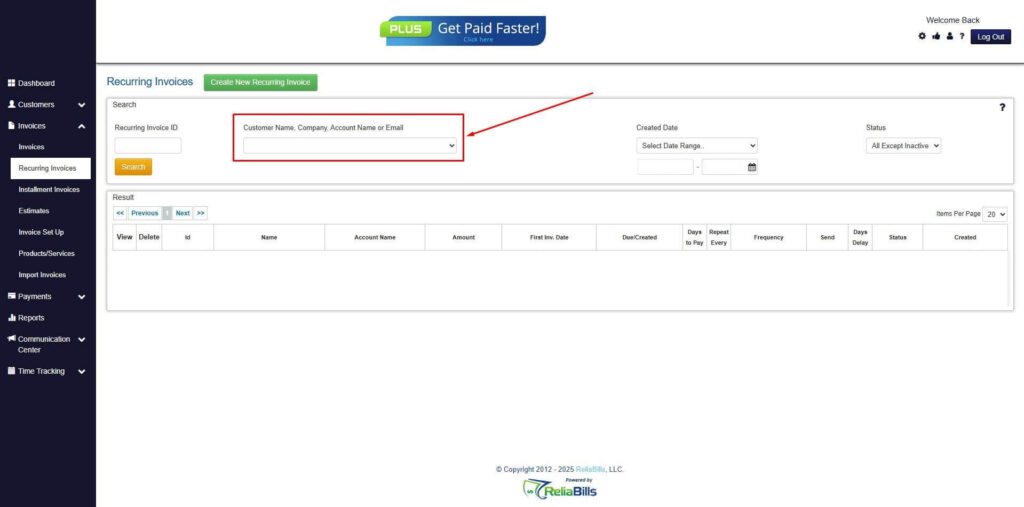
Step 4: Click the Create New Recurring Invoice
- If you haven’t created any customers yet, click the Create New Recurring Invoice to create a new customer.
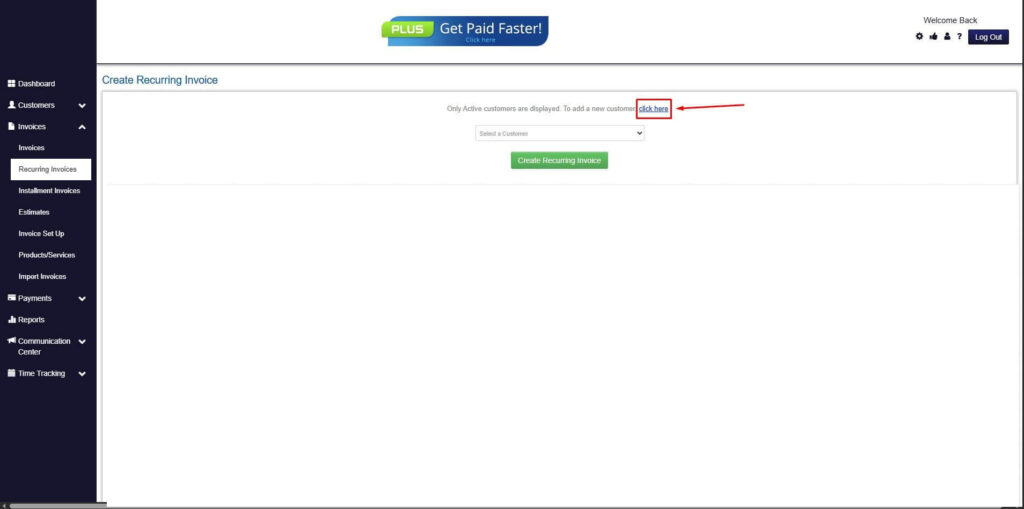
Step 5: Click on the “Click here” Button
- Click on the “Click here” button to proceed with the recurring invoice creation.
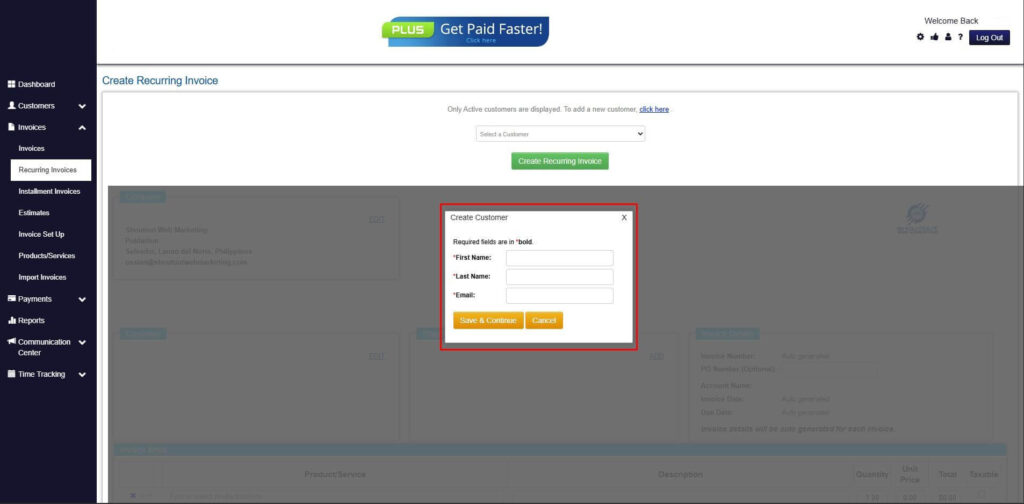
Step 6: Create Customer
- Provide your First Name, Last Name, and Email to proceed.
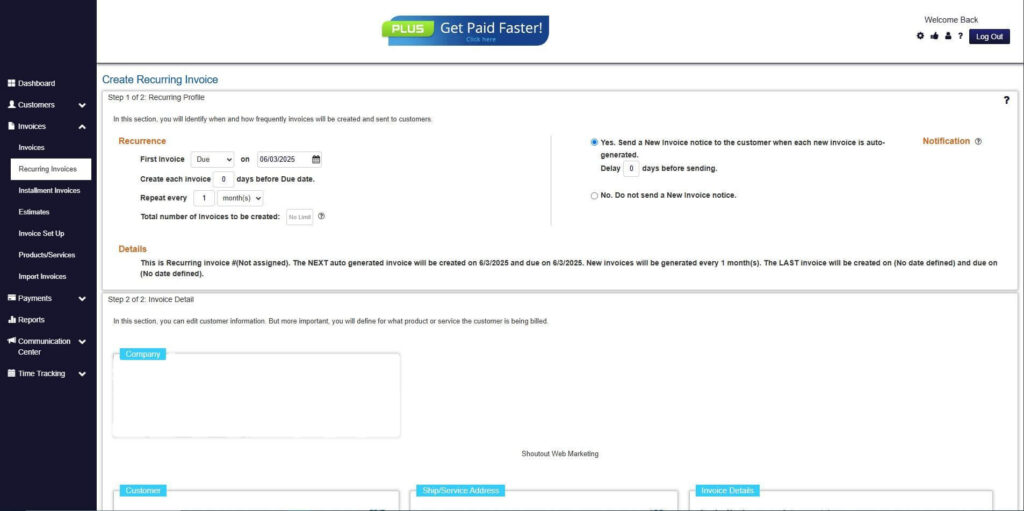
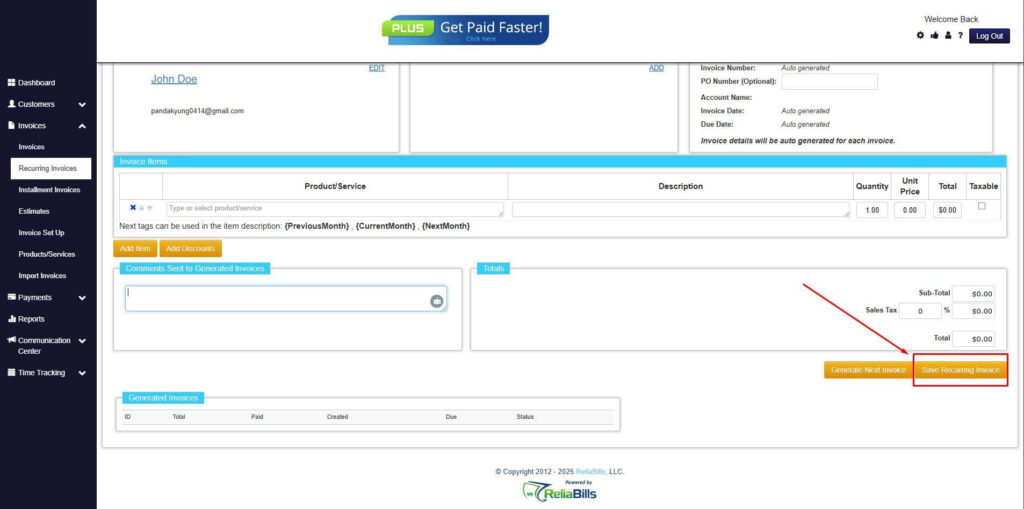
Step 7: Fill in the Create Recurring Invoice Form
- Fill in all the necessary fields.
Step 8: Save Recurring Invoice
- After filling up the form, click “Save Recurring Invoice” to continue.
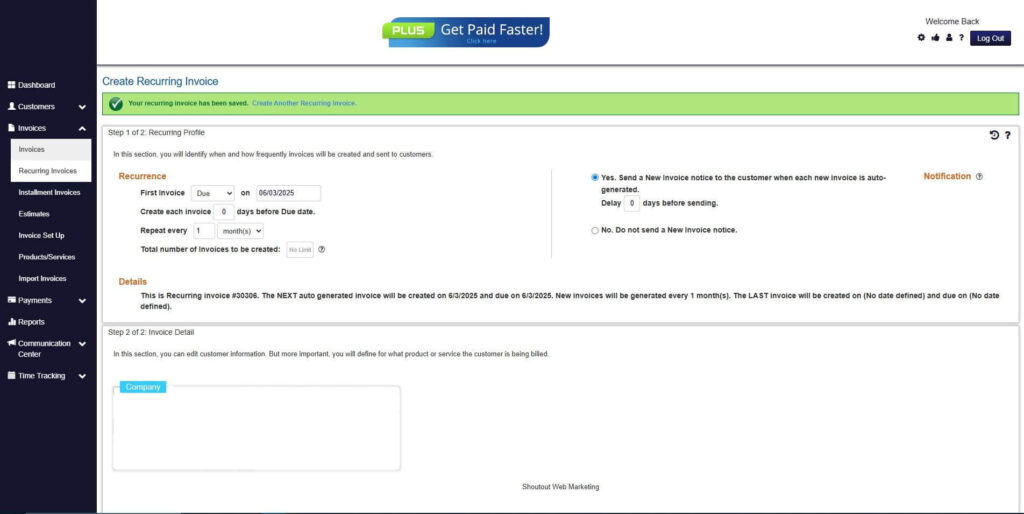
Step 9: Recurring Invoice Created
Your Recurring Invoice has been created.
Wrapping Up
With ReliaBills, you don’t have to worry about customizing your invoice template. ReliaBills is all about invoice making to perfection with everything you need available in different formats. That way, all you need to do is choose and start editing the template. Just fill in all the necessary details, upload your logo, and your invoice is all set.
You can even save and manage all of your client contacts. That way, it will be easier to keep track of them. In addition, all of your invoices come with a unique invoice number generated by ReliaBills. That way, you can keep track of it when it gets sent received and opened.
You will also get notified when the payment has been made. That way, you can focus more on other things while you get paid on time.