
As a web designer, your main goal is to craft beautiful designs for your clients’ websites. Value and dedication are the name of the game in your field. But did you know that you also need to put some emphasis on your web design invoice template?
You’re a web designer, so you’re pretty used to creating beautiful website design layouts. However, when it comes to creating attractive and professional web design invoices, most would agree that they haven’t put much thought into it. Fortunately, we’re here to help you.
Keep in mind that having professional experience right from the beginning up to the end is crucial. Sure, having an eye-catching website, a beautiful portfolio, and excellent web design skills are all great for getting customers’ attention. However, to retain them and keep them coming for more of your services, you need to have an effective invoicing system in place.
That means having a web design invoice that represents your brand, all while promoting on-time payments. In the past five years, the web design and development industry has risen to around 6.1%. This growth has it reaching a staggering $34 billion.
From that statistic alone, you can tell that business is, in fact, booming. There’s a lot of opportunities to get a considerable share of the web design industry. In this article, we’re going to talk about the basics of what a web design invoice is, what should be included, and important tips to make sure you get paid on time.
Don’t Spare Any Details
When crafting a web design invoice – or any type of invoice for that matter – it’s always essential for you to be thorough. That’s why you should include all the details regarding your web design business. So, when your web design invoice arrives in your customers’ email inbox, they should immediately know what it is and that it’s coming from you. A great way to ensure that this would be the case is by displaying your company details properly.
If you’re just starting out, you ought to know that the design of your invoice should fit on an A4 (8.5 “x11”) sized sheet of paper. That way, the customer will have the option to print it out if necessary.
The upper left or right corners should feature the following details:
- Your Business Name
- Complete Business Address
- Business Email
- Business Phone Number
- Fax Number
- Date
- Invoice Number (for starters, you can start at 001)
While these details do promote your brand, know that their primary purpose is to offer clarity to your customer. If you’re designing website for big-name companies, chances are your invoices will get lost or misplaced in their inbox.
However, with these details visible at the very top of your invoice, you can ensure that the finance department will easily determine and record your web design invoice into their books for payment.
Do you have a logo for your brand or business? Make sure to add that feature in your invoice as well. Essentially, do everything you can to make your invoice noticeable and distinguishable.
Make Sure the Client’s Details are Accurate
After you add your business details, the next thing you need to add is your customer’s information. Again, you can use the same format as your business details. Just make sure that your customer’s details are accurate and correct.
Also, don’t forget to include a contact person’s name right beneath the business name. Make sure that this individual is the one who’s handling your account. Again, it can get confusing if you are handling big-name companies. That’s why you should include the person’s name – the one responsible for hiring your services. It can also be the one who is paying you or the one who oversaw the entire project that you did.
The last thing you want is your web design invoice getting passed around from person to person; department to department. That’s why you need to make sure that they will know what it’s for the moment they open it.
Include an Itemized List of Services Rendered
A plain web design invoice email that simply shows the subtotal for a project you just did isn’t going to be enough to convince your clients to pay you. If you’re wondering why just put yourself in your client’s shoes. If you we’re them, you’d also want to know exactly where your money is going.
This case is especially important if the project you’re doing increased in size and demand after you started handling it. That’s why in this event, your invoice subtitle will be different than your estimated price, causing a potential dispute.
To avoid confusion and suspicion, it’s always a good idea to create an itemized list for all of the things that you want to get paid for. This list should include the services provided, an adequate description, the corresponding cost (unit or hourly), and the subtotal at the bottom.
By using this format, the client can easily identify what the service is, why its cost is what it is, and the total amount that they owe you. If you’re charging hourly, consider including your rate, along with the number of hours that you spent on a particular task or service.
If you charge by project, you need to simply list the price for the service rendered. Make sure you leave room for detailed descriptions.
Let Your Design Skills Show Through Your Invoice
Of course, you wouldn’t want to send off a web design invoice that looks plain and boring. A textbook black-and-white, page-long, receipt-looking invoice isn’t going to entice anyone to do business with you again.
If your web design invoice looks just like any ordinary-looking invoice, then the chances are high that it will get lost in a sea of other emails or paperwork. Fortunately, you can avoid this by providing some design and layout to your invoice. Go for something that resonates with you and your brand.
It can be extravagant; with all the glitz and glamor and other attractive designs, you can think of. Sometimes, it can also be as simple as including your brand colors and logo. You can even give your entire template a unique design to make your entire web design invoice some pizazz that will help it stand out.
All of these elements will help your brand get recognized by your clients, as well as showcase your web design skills. So, it’s like hitting two birds with one stone. However, keep in mind that the primary goal for your invoice is to make it simple, understandable, and of course, attractive.
Establish a Payment Deadline
If your clients were fine about giving you a deadline to complete the design project, there shouldn’t be any unfair reason not to return the favor. You can include a due date in your web design invoice for the total amount owed. This feature is especially essential when you’re working with newer clients.
When you establish yourself a professional brand, you will be treated as such. However, keep in mind that you should convey your payment terms before coming to terms with a client.
The perfect time to bring this up is when you’re providing an estimate to a potential client. Let them know that all payments are due within whatever time frame you choose (e.g., 7 days, 30 days, etc.).
Avoid setting the due date too far into the future. Many factors will come into play. You might need payment on something, and you need funds right away. Your client might forget that they actually owe you money during that period. You might forget that a client actually owes you money. Whatever the case is, setting the deadline too far will be inconvenient for you.
The payment terms should be clear and concise. Make sure you include them in a section of your web design invoice. These details should be at the bottom near the subtotal.
Along with the due date, you should also state the consequences of late payments. For example, you can add on a late fee to the subtitle for every week that an invoice is late.
You should also offer multiple payment options. Keep in mind that the more convenient you are to your clients, the more likely they will come back to acquire your services.
Here are some examples of payment options that you can offer:
- PayPal
- Transferwise
- Bank (credit or debit)
- Direct Payment (if local)
- Check
If you’re accepting checks, make a policy for what happens when it bounces. You can also make policies for each payment option that you offer. Make sure you keep your terms of payment brief and to the point. That way, your customers will be aware of the consequences if they pay late.
Improve Accessibility and Simplicity of your Invoice
With digital ruling our lives today, sending out paper invoices and waiting an entire month to get paid is now a thing of the past. Not only was that process inconvenient, but it also increases the chances of your invoice being lost. Fortunately, you can now eliminate this possibility completely by opting for a more accessible and simple way of creating a web design invoice.
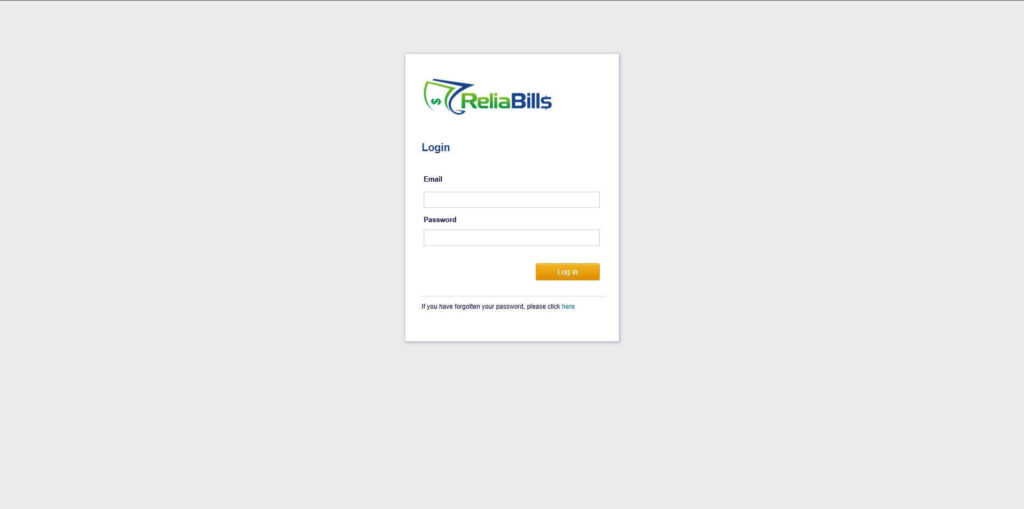
Invoicing platforms like ReliaBills make life easier for you. It allows you to create unique and professional invoices and track them, all in one place. Using ReliaBills guarantees that your clients will receive your invoice and you receiving their payment on time.
ReliaBills also allows your customers to pay online right from the email itself. Once they confirm, they will be taken to a secure page to either entire their card details or log in their online payment portals. Overall, ReliaBills is the game-changer that’s providing high amounts of value to small businesses.
If you want more, you should also know that ReliaBills is 100% FREE – with a $24.95 price if you decide to upgrade to ReliaBills Plus for added features.
BONUS: Automate Your Billing System!
If you want to take your billing system to the next level, you need to incorporate automation into your entire strategy. Recurring payments is one such example of modern-day invoicing. It offers efficient invoicing that will provide you with a steady and consistent cash flow. At the same time, you will also enjoy the benefits of not having to do invoicing manually again.
ReliaBills uses this type of payment system for its PLUS plan. At the same time, it also gives you access to a simple yet effective recurring billing system. Our software will help you get started with your transition to recurring billing and help you establish a solid billing system that’s ideal for present and future applications.
With ReliaBills, recurring billing, invoicing, and payment will be seamless every step of the way. You will encounter lesser problems with your billing system since everything functions automatically. Recurring billing software will be able to guide your customers throughout the entire process. From creating your invoice to processing your payment, everything is done automatically so that you won’t have to stop for anything.
Why Recurring Billing?
Recurring billing is a strong payment mechanism that allows your business to receive ongoing payments while ensuring that you only get card information from your customers once. It’s pretty similar to a subscription system in a lot of ways. The only difference is that recurring billing doesn’t necessarily involve the standard subscription billing system’s pricing levels.
ReliaBills recurring billing is a positive feature for your business because it guarantees consistent and predictable cash flow. At the same time, the entire setup is automated, which will help you save time and other valuable resources. Effective recurring billing systems can be implemented with the help of the ideal subscription management tools. In addition, it will also deal with challenges like fraudulent payments and payment failures.
If you want a feature-rich recurring billing system that offers everything you need to run a fluid payment process, ReliaBills is the one you need. With ReliaBills, you can automate your invoice creation, ensuring that all the invoices you generate are unique and professional-looking.
You can also give your customers some convenience and peace of mind by enrolling them in AutoPay. Once you do, you can charge them automatically without having to ask for permission every month. Even if the pricing changes every month, you can maintain your automated billing system and get paid on time.
In addition, all of the invoices you create on ReliaBills will be explicitly designed for recurring billing. Your invoices will display all the essential information and the current and accurate items and amounts you’ll be billing your customer for a particular period. Changes will be made automatically, but you can do so if you want to make the manual changes. Just remember to save your work so that the changes will be made.
How to Create a New Recurring Invoice Using ReliaBills
Creating a New Recurring Invoice using ReliaBills involves the following steps:
Step 1: Login to ReliaBills
- Access your ReliaBills Account using your login credentials. If you don’t have an account, sign up here.
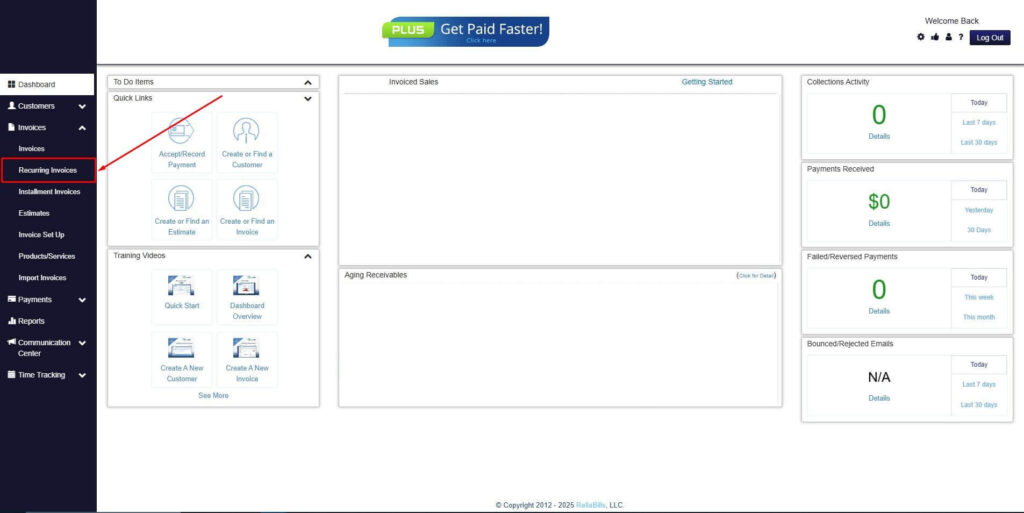
Step 2: Click on Recurring Invoices
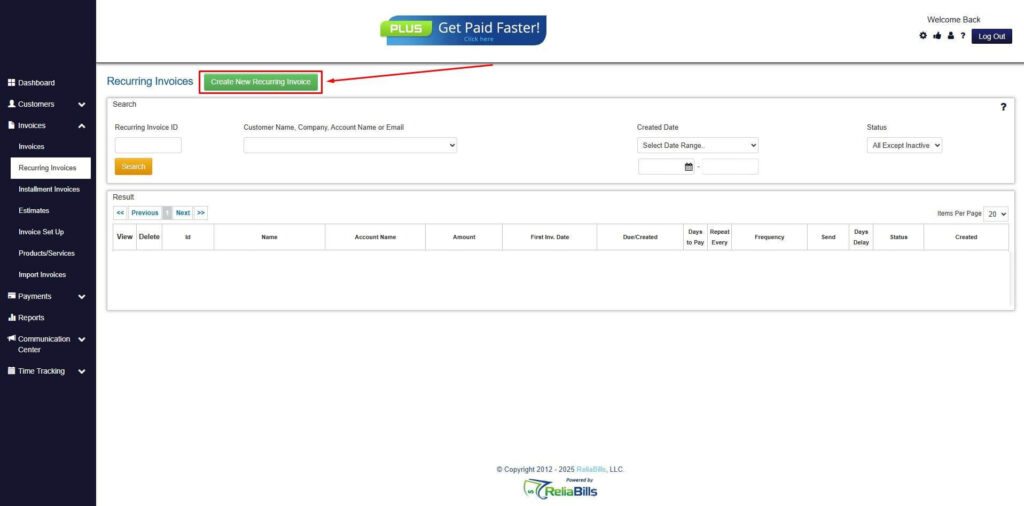
- Navigate to the Invoices Dropdown and click on Recurring Invoices for an overview of the list of your existing customers.
Step 3: Go to the Customers Tab
- If you have already created a customer, search for them in the Customers tab and make sure their status is “Active”.
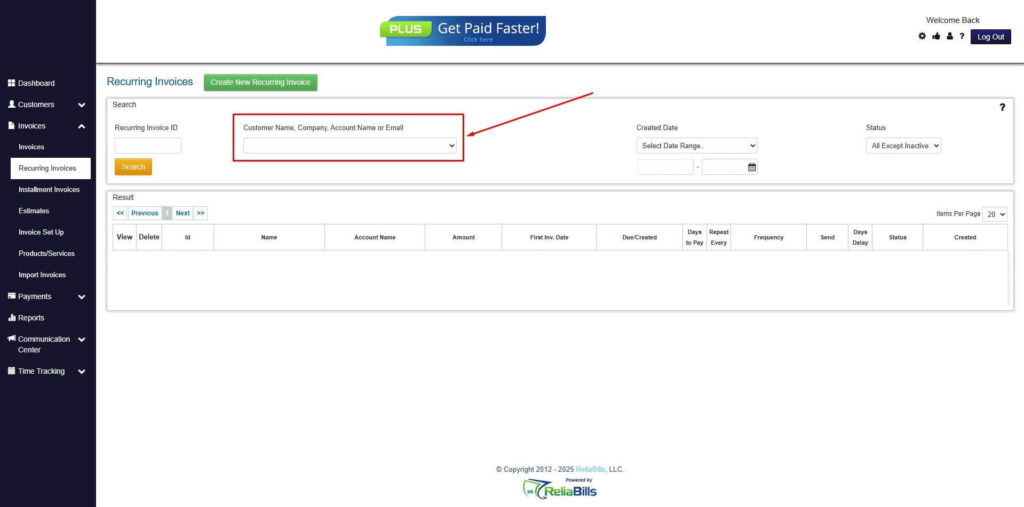
Step 4: Click the Create New Recurring Invoice
- If you haven’t created any customers yet, click the Create New Recurring Invoice to create a new customer.
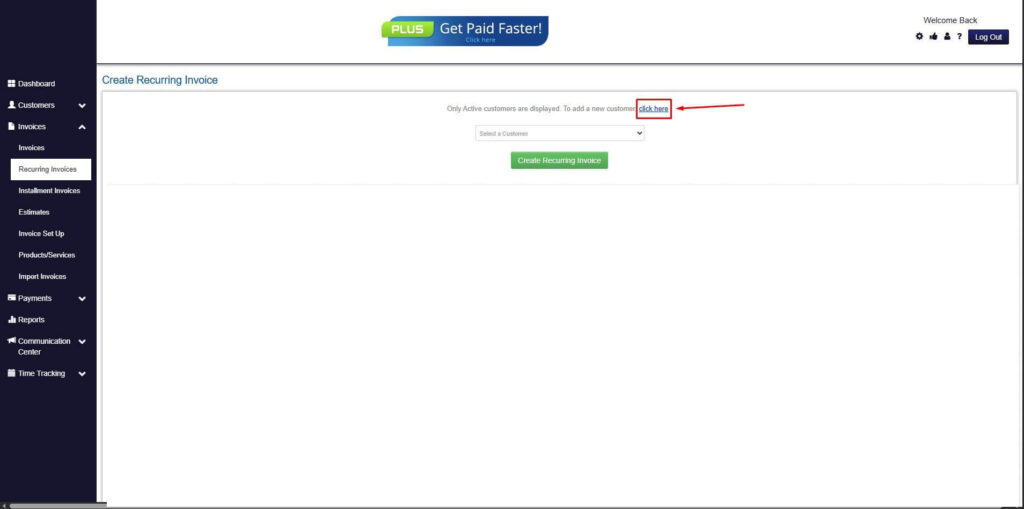
Step 5: Click on the “Click here” Button
- Click on the “Click here” button to proceed with the recurring invoice creation.
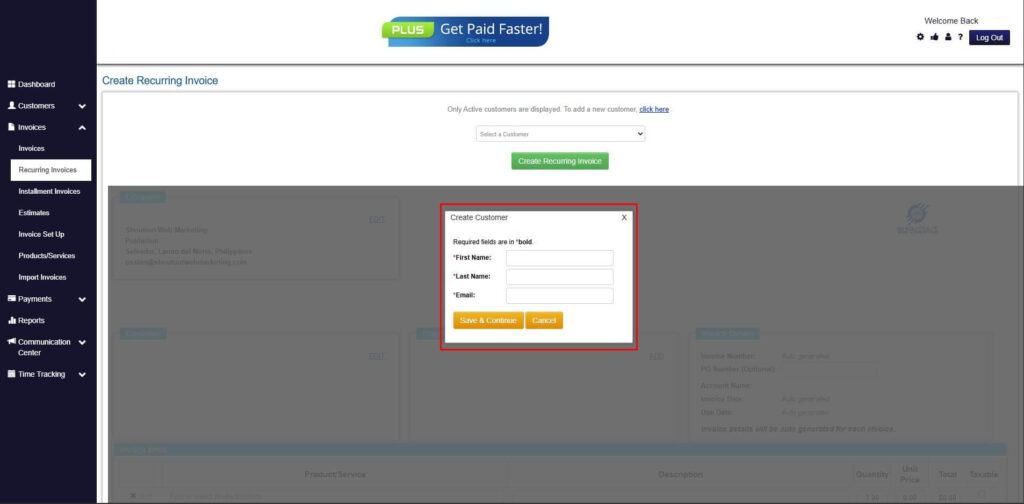
Step 6: Create Customer
- Provide your First Name, Last Name, and Email to proceed.
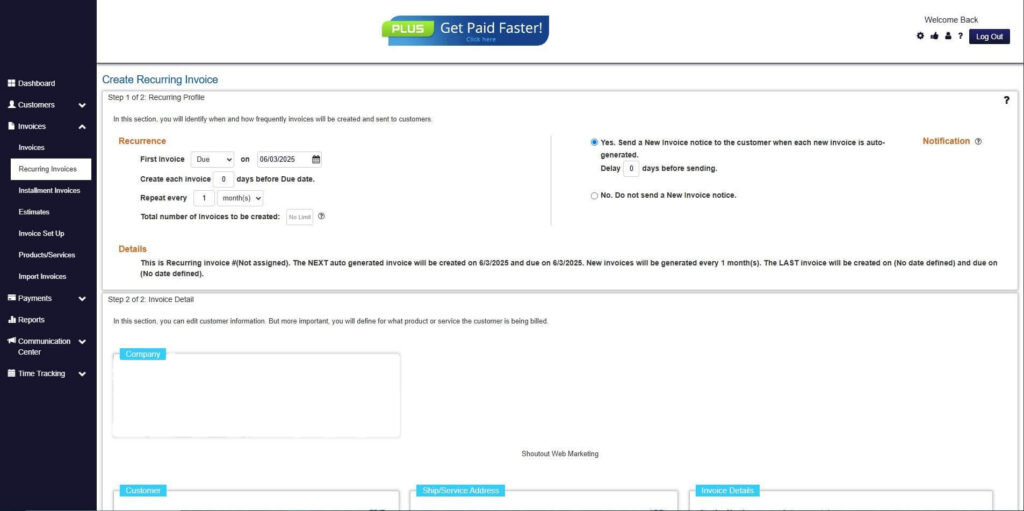
Step 7: Fill in the Create Recurring Invoice Form
- Fill in all the necessary fields.
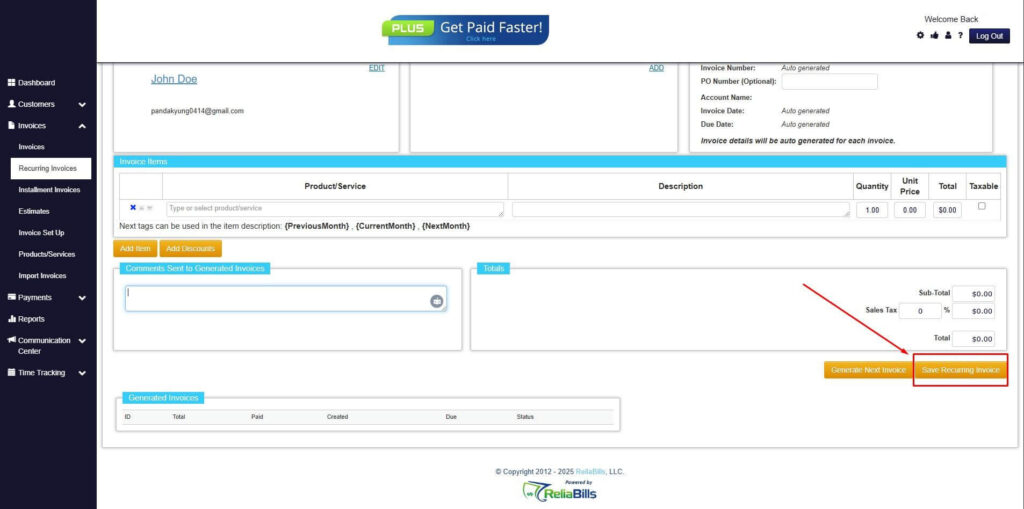
Step 8: Save Recurring Invoice
- After filling up the form, click “Save Recurring Invoice” to continue.
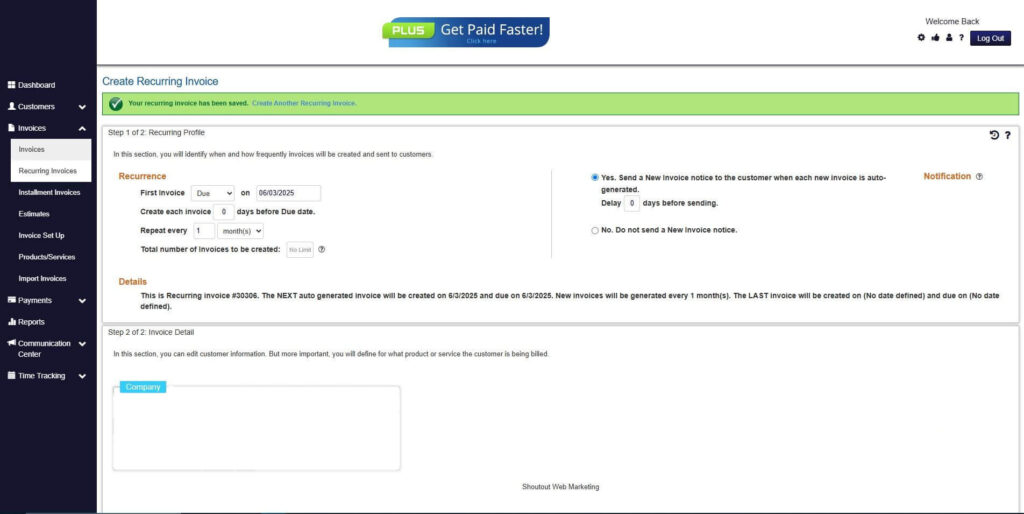
Step 9: Recurring Invoice Created
- Your Recurring Invoice has been created.
Wrapping Up
So, there you have it – a set of tips and guides to help you create the best web design invoice. Make sure you use each point in this article when creating and sending out invoices. That way, you will get paid on time and attract more clients all at the same time—best of luck on your career.