
How Can We Help?
Recurring Invoices
Create New Recurring Invoice
With ReliaBills, you can completely automate the creation of invoices. Recurring billing. Installment billing. Variable billing.
- Start at the Invoices tab and then go to Recurring Invoices.
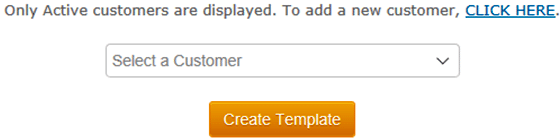
- Creating a recurring invoice is not that different than creating a single invoice. Start by selecting the customer.
- If you haven’t created any yet, go to the Customers tab and create the new customer. Only Active customers are displayed in the dropdown.
- So if you don’t see the customer you created, search for them in Customers and make sure their status is “Active”.
There are two sections in recurring invoices: The Recurring Profile (this defines when and how frequently invoices are to be generated). And the Invoice Details (this defines the invoice that is to be generated).
Recurring Profile
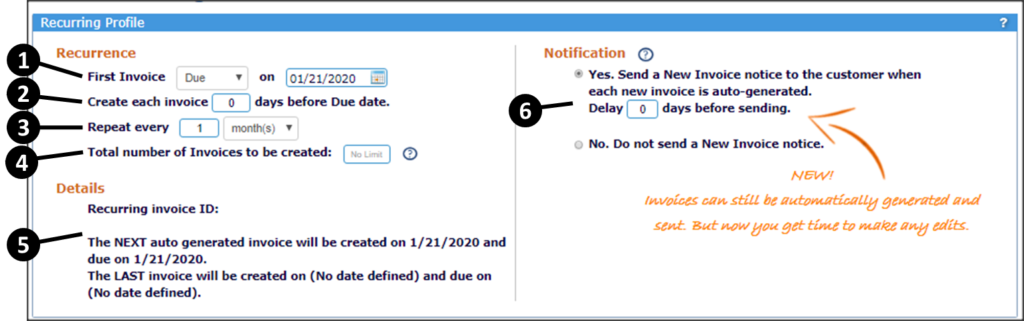
- First Invoice: Consistency is VERY important in recurring billing. The varying number of days per month can create a mess. That’s why we give you the option of having your invoices generated based on either a DUE date or a CREATE date. Use the drop-down to have invoices DUE on the same day each period or CREATED on the same day.
Example: Do you want to have invoices CREATED on the first day of every month or DUE on the first day? - Days to Pay: Two dates are very important: the date on invoices are created and then the date the invoice is due. If, in step 1, you selected to have invoices generated based on CREATE date, then here you select how many days AFTER the create date the invoice would be DUE. If, in step 1, you selected to have invoices generated based on the DUE date, then here you would select how many days BEFORE the due date invoice would be CREATED.
- Repeat Every: Use the drop-down to have your invoices generated based on a defined number of days, months, years. For example, to have invoices automatically generated quarterly, enter “3” and then select “Month(s)”
- Total Number of Invoices to be Created: Leave this field blank. If there is no fixed number of invoices to be created and payments to be made. However, if you are setting up a fixed number of payments such as an installment plan. Enter the number of invoices to be created here.
- Details: This section is essential for your information. Based on the information that was entered in the previous steps, you will see when the next and the last invoices are to be created.
- Notifications: Here you can define whether or not you want to send each invoice to your customer when it is generated. Some business doesn’t want any notification. They just want to bill their client. In that case, select the “No” option. But if you want ReliaBills to send the invoice automatically when generated, select the “Yes” option. Some business has add-on fees in addition to the normal, recurring fee. ReliaBills allows you to benefit from automatically sending invoices…but here you can delay the automation by a few days. That gives you time to make any modifications or additions.
Invoice Details
Here, you are essentially creating an invoice. You would follow the same steps as defined in Create New Invoice (see Invoices=>Create New Invoice). There are, however, just a few differences:
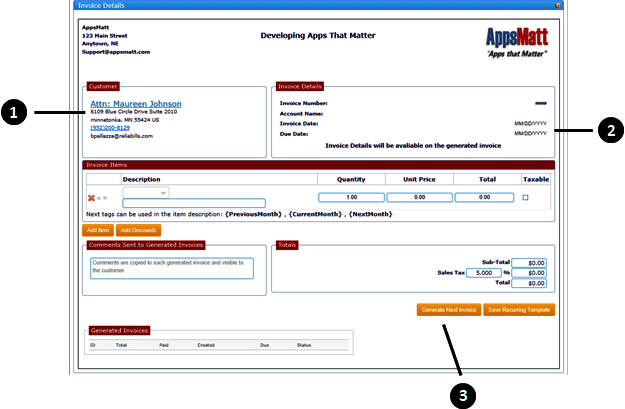
- Customer: You already identified the customer when you began creating the recurring template. So the customer appears here.
- Invoice Details: Remember, this is not an invoice. You are creating the logic for which invoices are to be generated. So in the template, these fields are not yet defined. They will be defined on each invoice that is generated.
- Generate Next Invoice: After clicking the save button, you are done. The system will automatically generate invoices as defined by the template. However, there are times when you may want to generate invoices manually. By clicking the button, you can “pre-generate” invoices. This is great if you need to adjust an invoice. All invoices generated by the template (automatically or manually) will show in the lower-left (under “Invoices Generated”).
- IMPORTANT: The ReliaBills Automation Processor runs at approximately 1:30 AM CST every day. So if you create a recurring template with instructions to create the first invoice TODAY, that invoice will not be created until the next run of the Automation Processor. This is one of the reasons why we allow you to manually generate the next invoice.
Deleting a Recurring Invoice
- Just like invoices, a recurring invoice can also be deleted. But it cannot be reopened or recreated after being deleted. Individual invoices that were generated by the template will remain.
- They are not deleted, so only future invoice creation is stopped. You can think of it as a template or guide.
NOTE: In conclusion, if you delete a Recurring Invoice, no future invoices will be created.
Editing a Recurring Invoice
- The recurring invoices can be edited after it has been created. Also, it can be edited after the individual invoices have been generated. The changes you are making to the recurring invoice will NOT affect your individual invoices that are already generated. Therefore, changes will affect only your future invoices.
- Simply click View the recurring invoice. Make any changes and then save the recurring invoice.
Using Date Tags in Recurring Invoices
- Recurring invoices can generate and send invoices on a regular basis. Sometimes, customers are confused about which invoices are paid and which are open. This is especially the case when the amount being billed is the same from period to period and when the time between billing cycles is short. This is where date tags can help.
- Date tags allow you to automatically pull the month of service into your recurring invoices. So instead of billing for “Cleaning Service”, you can bill “Cleaning Service for the month of September”. This makes it much easier for customers to recognize and differentiate between invoices.
- Date tags are located in the “Invoices Items” section of a recurring invoice. They are only available for use with Recurring Invoices. When an invoice is automatically generated, the date tag displays a specified month. For example, if an invoice is generated on October 1st (the month of October). And the tag used is {PreviousMonth}, the month of “September” will be used in the invoice items. Similarly, if the invoice was created on June 18 and the tag {NextMonth} had been used, the month of July would have been displayed.
- Applying date tags is simple. When entering the name of the billable service, instead of using just “Lawn Mowing”, use “Lawn Mowing for {PreviousMonth}“. Or instead of “Monthly Security Monitoring”, use “Monthly Security Monitoring for the Month of {NextMonth}“.
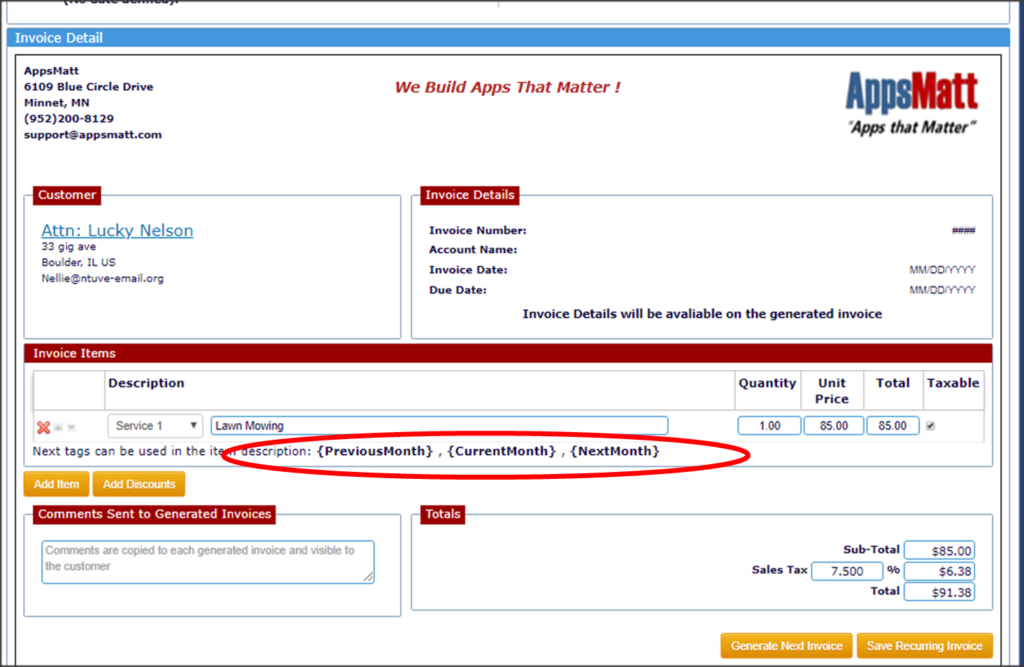
It is VERY important to use the tag exactly as displayed. The { } are required. No spaces. And capital letters as displayed.