
Invoices
Creating a New Invoice
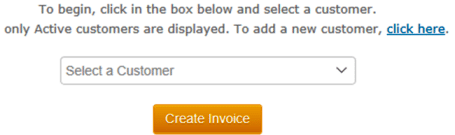
1. Select a Customer
If you haven’t created them yet, go to the Customers tab and create the new customer. The drop-down shows only Active customers. So if you don’t see the customer you created, search for them in Customers and make sure their status is “Active”.
2. Create Invoice
Click “Create Invoice” to start filling invoice data for the selected customer.
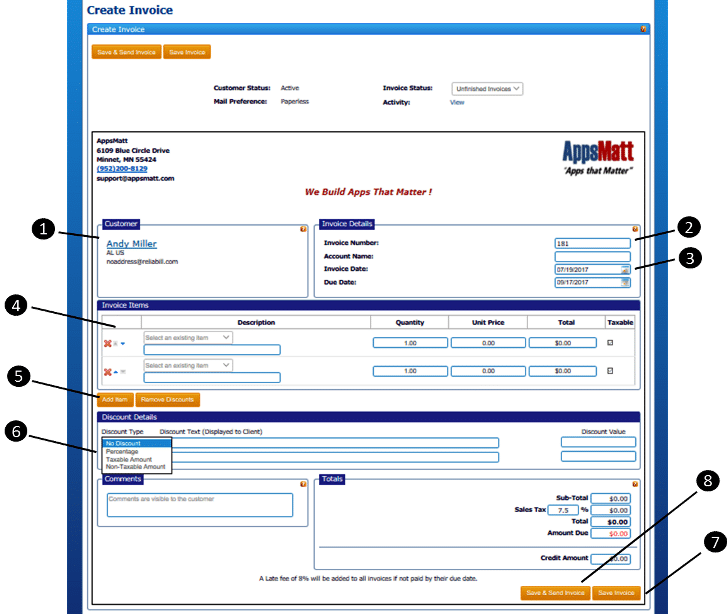
3. Confirm Customer
It’s always a good idea to make sure you have the correct customer.
4. Invoice Number
This number, by default, starts with 100 and increments itself by 1 every time you or the system generates a new invoice. You can change the start number by going to Invoice Set Up. You can edit this number as long as the number you entered has not already been used. IMPORTANT: ReliaBills only accepts invoice numbers that are numeric. No letters or special characters.
5. Invoice Date
The system will automatically generate this for you upon the creation of the invoice. You can edit this date.
Due Date: This date will automatically be the same date as the create date unless you have defined your terms in Account Settings. Go to Account Settings (Black gear in upper right)…then Payment Processing…then Payment Policies. Select from the dropdown and Save. All new invoices created will use this new selection as the default. You can still manually change any open invoice at any time.
6. Invoice Items
Items can be manually entered here. Or to save time, you can pre-create products by going to Invoices=>Invoice Set Up=>Manage Your Products. Pre-created products will be displayed in the drop-down and can be added with a click.
7. Add Item
Click the Add Item button to add more lines. Click the red X to delete lines. Arrange the order by clicking the blue arrows.
8. Add Discounts
ReliaBills supports THREE types of discounts:
- Percentage Discount is applied to the invoice subtotal. Enter the percentage as a whole number (for example, enter a 15% discount as 15).
- Taxable Amount is entered and displayed as a dollar amount (for example, use 5 for $5.00) and is applied at the sub-total. Taxes are applied AFTER the discount. It is because this discount affects the taxable amount that it is called a taxable discount. This is the most common type of discount.
- Non Taxable Amount is also entered and displayed as a dollar amount (for example, use 1.5 or 1.50 for $1.50). However, this discount is not applied until AFTER taxes are applied. Because this discount does NOT affect the taxable amount, it is called a non-taxable discount.
9. Save
To save your invoice (without sending) click the Save button. You have the option to save as Open or as Unfinished. An Open invoice can be billed and or paid and it will show up in all reporting including revenue reports. An Unfinished invoice is a draft. It cannot be sent to the customer and can’t be paid, therefore, it will not show up in any revenue reports.
10. Save and Send
This button simply combines two steps. It saves the invoice as Open and launches the emailer (see Communications Manager=>Email Manager) so that the invoice can be sent to the customer.
Deleting Invoices
1. There are two simple ways to delete an invoice. Search Invoices to find the invoice that you want to delete. Then click the “Delete” link.
2. You can also view the invoice and simply change the status to “Deleted” then save the invoice.
IMPORTANT: When an invoice is deleted in ReliaBills, it is never removed from the system. Its status is simply changed to deleted. It will no longer show in any revenue reporting. It cannot be sent to the customer. The customer will receive no late payment reminders.
To view a deleted invoice, simply search for invoices with status “Deleted”. A Deleted Invoice can be re-opened. See Re-Open a Deleted Invoice.
Editing Invoices
In order to edit an invoice, the invoice status must be either Open or Unfinished. An invoice with a status that is Deleted, Refunded or Paid cannot be edited.
- In order to edit an invoice, go to the Invoices Tab.
- Search for the customer and then View the invoice.
- As long as the invoice status Open or Unfinished, simply click on the desired field and make any edits or modifications.
- Save the invoice when complete.
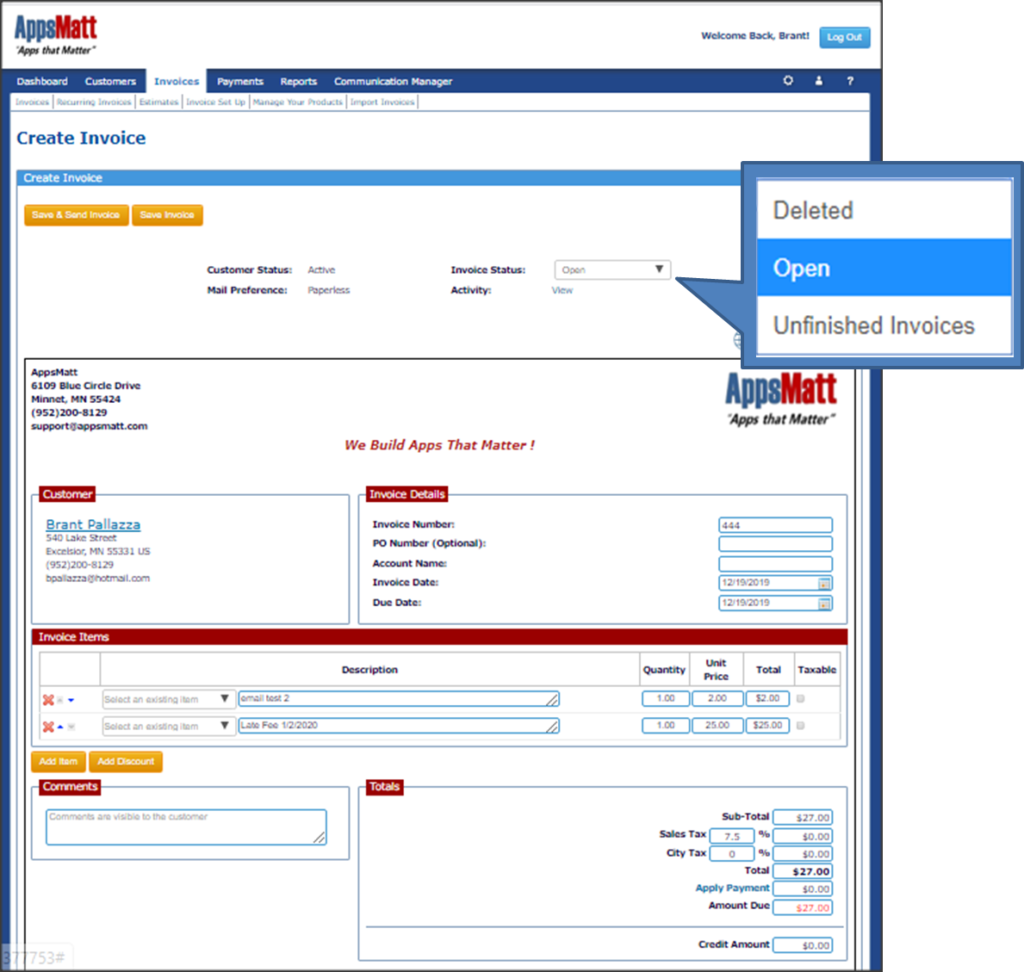
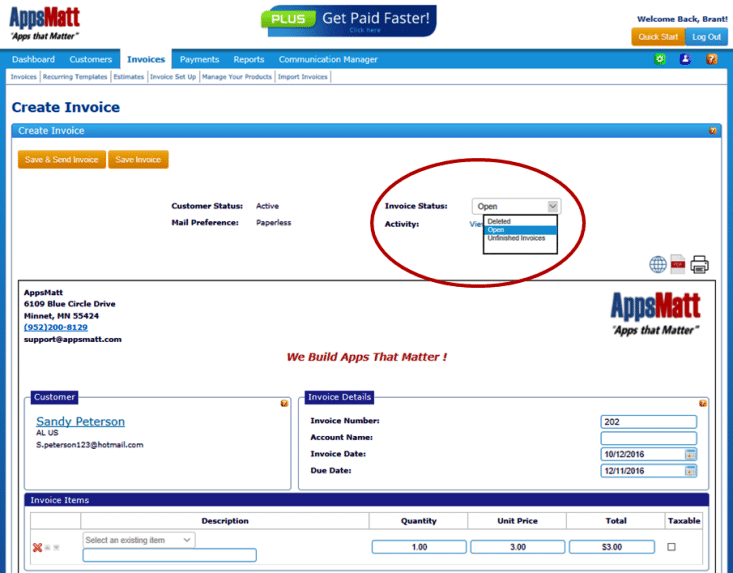
Invoice Status
An invoice can have one of FIVE status: Open, Unfinished, Paid, Deleted, Refunded.
An open invoice can be saved, edited and sent to the customers. When an invoice is Open, it appears in all reporting.
- Open. An open invoice can be saved, edited and sent to the customers. When an invoice is Open, it appears in all reporting.
- Unfinished. An Unfinished invoice is much like a draft. An Unfinished invoice can be saved and edited. But it cannot be sent to customers. It also does not appear in any financial reporting.
- Paid. An invoice can be marked as paid manually, or it can be automatically marked as paid when a payment is applied. Once an invoice is marked as paid, it cannot be edited or sent to the customer.
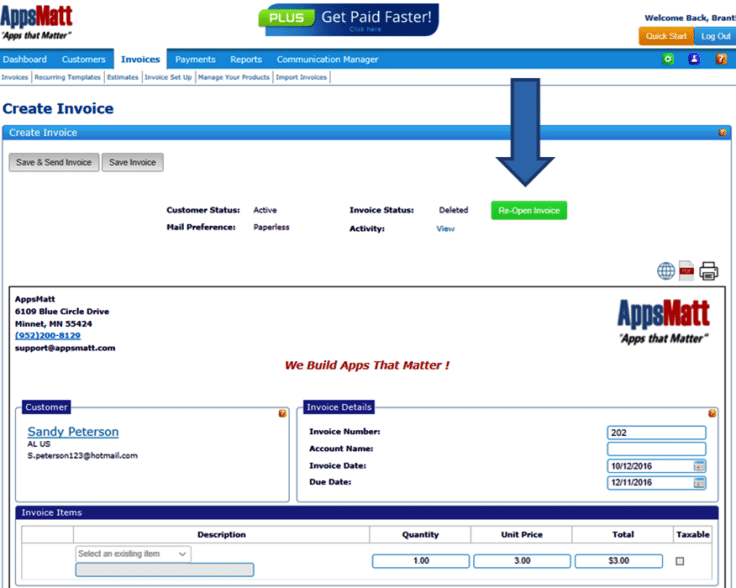
- Deleted. When an invoice status is changed to Deleted, it cannot be edited or sent to the customer. A Paid invoice cannot be deleted. Deleted invoices do not appear in any financial reporting. IMPORTANT: When an invoice status is changed to Deleted, the invoice is removed from all financial reporting. However, the invoice is not removed from ReliaBills. This is simply a status change. You can search and view deleted invoices in ReliaBills. To re-open a previously deleted invoice, simply view the invoice and click the Re-Open Invoice button.
- Refunded. When a payment that has been to an invoice is refunded, the status of the invoice changes to Refunded. Like Deleted Invoices, a Refunded invoice cannot be edited or changes.
Printing Invoices
When you are ready to print invoices, you have several options: You can print invoices individually or in batch.
To Print Invoices Individually. From the Invoices tab, use the search functionality to see the listing of the invoice or invoices that you wish to print. Click the Print/PDF link to print the invoice.
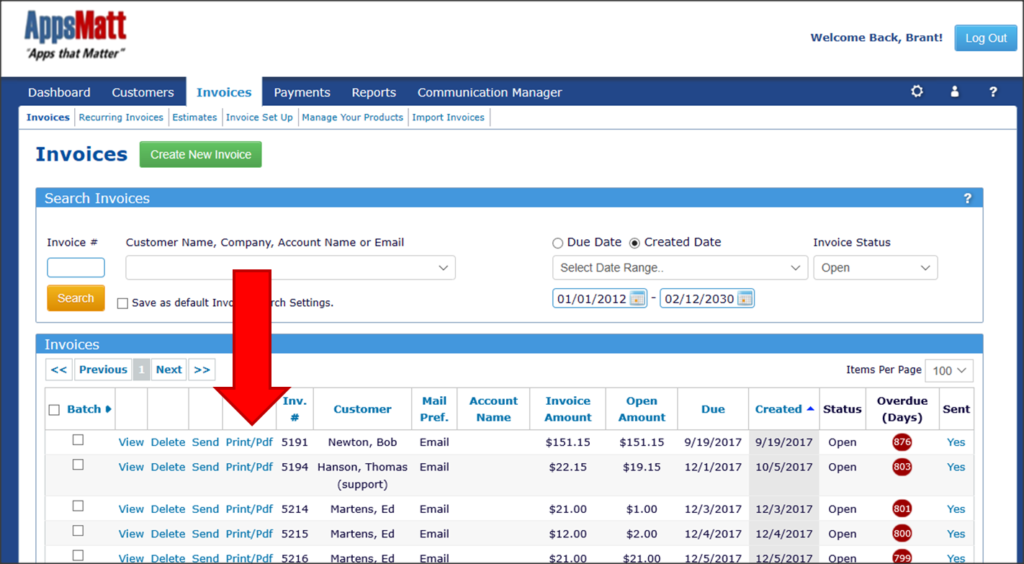
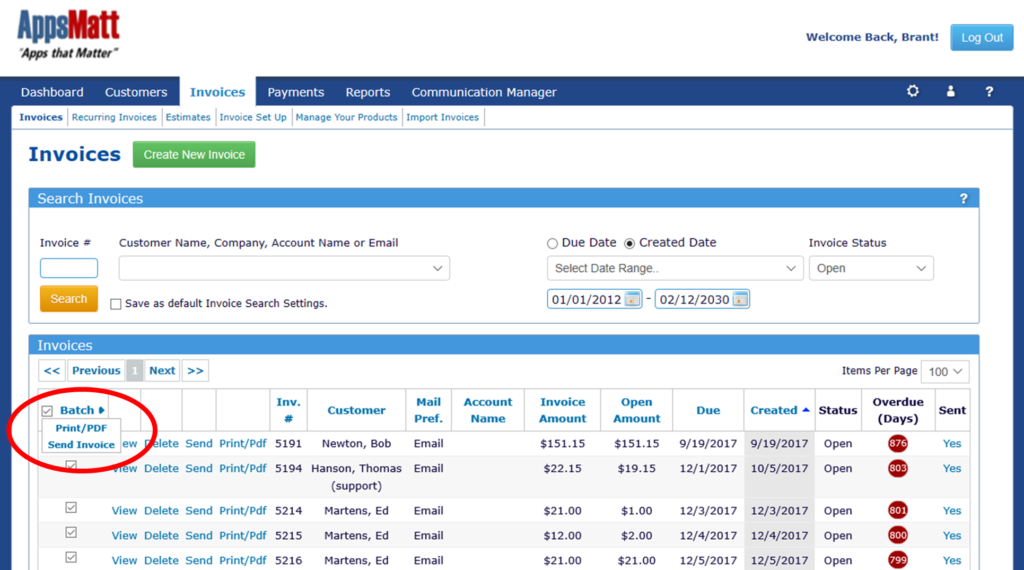
To Print Multiple Invoices or In a Batch. From the same listing of invoices, check the box next to each invoice to be printed. To select all invoices on the page check the box next to the word Batch. Then click Batch to display the option to Print or Send.
Re-Opening Invoices
- To re-open a deleted invoice, search for Find and open the deleted invoice.
- Then click the green “Re-Open Invoice” button.
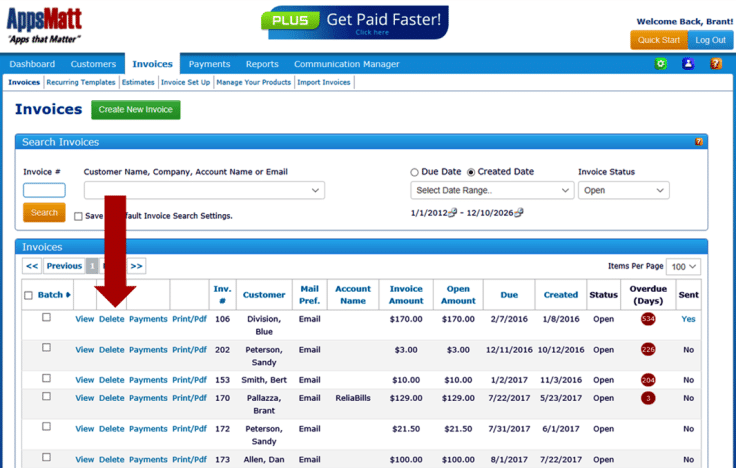
Searching Invoices
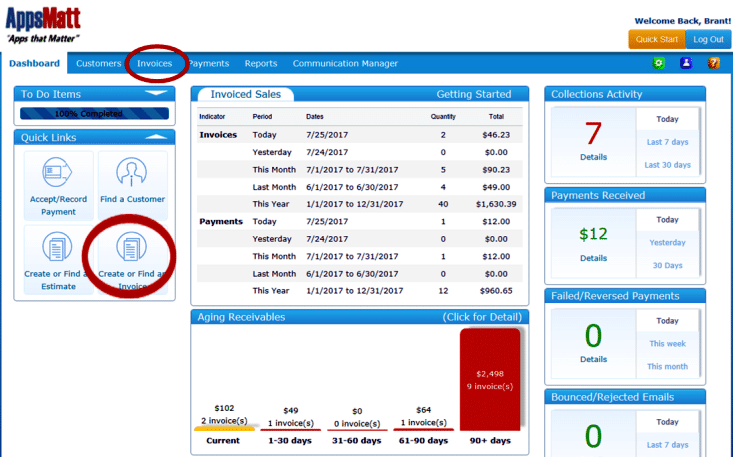
1. Finding an invoice is easy. From the Dashboard, click on the Invoices navigation or use the Quick link. Both will take you to the Invoices page.
2. From here, you’ll see a list of all your invoices. Use the filters to search for a specific invoice or a specific customer. You can sort the display by clicking on any blue column heading.
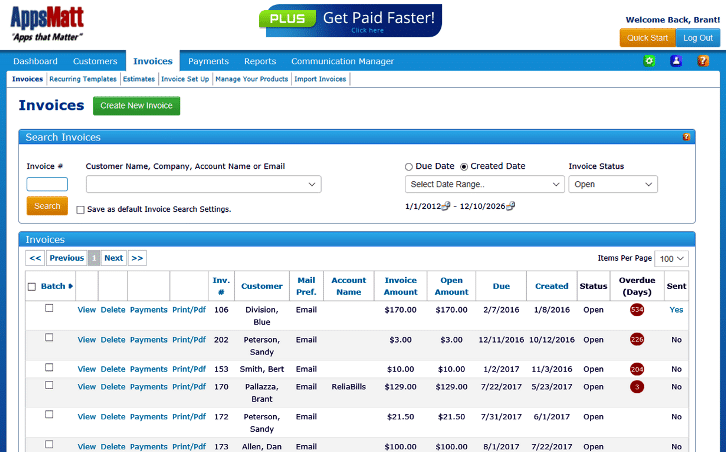
3. Saved Search. And if there are certain searches that you do regularly, just check the “Save as default Invoice Search Settings” box and then click the Search button. That way, every time you come to this page, it will automatically load your saved search settings.

4. Batch. If you have lots of invoices to send or lots to print, just click the Batch. You can check one box to select all or check the box next to specific invoices. Then click Print/PDF to print the selected invoices or the Send Invoice to send. IMPORTANT: When sending in batch, invoices will be sent according to the customer’s mail preference. The email template used will be the New Invoice template.

Sending Invoices
1. Deliver your invoices with an awesome, personalized message with just a click!
2. When you’ve completed an invoice and are ready to send it to the customer, just click the Save & Send Invoice button.

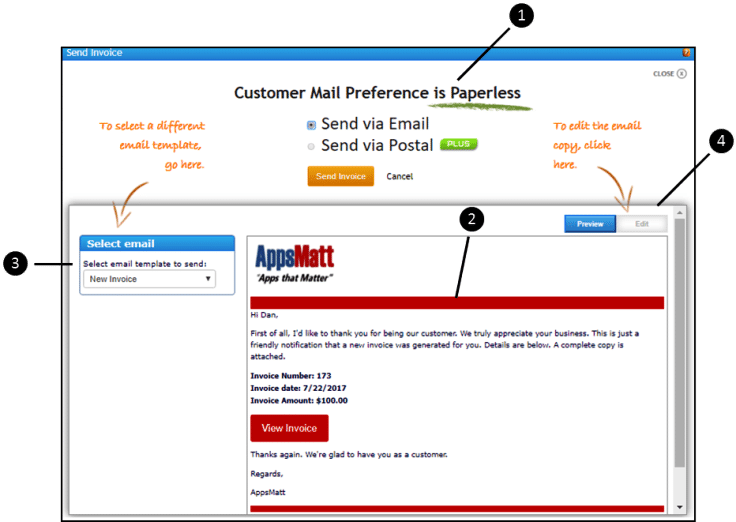
3. Mail Preference: The first thing we do is show you the customer’s current mail preference (paperless or postal). Just click the Send Invoice button and we’ll send your emails for FREE. But we’ll also print, fold, insert and mail your invoices. Just upgrade to PLUS. Pricing and terms do apply.
4. Email Message: The New Invoice email template will be displayed (all your email templates are all located in the Email Manager). If you like the way it looks and you like what it says, just click the Send Invoice button.
5. Select an Email: If you want to send one of your other email templates (past due reminders, late fee reminders, etc.) just use the dropdown to select the email that you want to send.
6. Edit an Email: If you’ve selected an email template but the message isn’t quite right, just click the Edit button to make changes. IMPORTANT: Any changes that you make will apply to this individual email ONLY. If you want to make changes to the template, go to the Email Manager (located at Communications Manager=>Email Manager).
7. Send Invoice: When all is exactly the way you want, just click the Send Invoice button.